Your RV Slide Out: A Vertical Adjustment Guide – Maintaining Perfect Alignment
The RV lifestyle offers unparalleled freedom and adventure. Whether you’re a seasoned road warrior or a weekend explorer, the convenience of a recreational vehicle (RV) is undeniable. However, to fully enjoy the comforts of your home on wheels, every component must function flawlessly. One of the most critical, and often misunderstood, aspects of RV ownership is the slide out. This guide provides a comprehensive approach to understanding and executing vertical adjustments on your RV slide out, ensuring smooth operation and extending the lifespan of this essential feature.
The slide out is a marvel of engineering, expanding your living space at the touch of a button. But like any complex mechanism, it requires regular maintenance and occasional adjustments. Vertical alignment is paramount to the proper functioning of your RV slide out. Misalignment can lead to a host of problems, from uneven wear and tear to complete system failure. This guide aims to demystify the process, empowering you to tackle vertical adjustments with confidence.
Understanding the Importance of Vertical Adjustment
Before delving into the practical steps, it’s crucial to grasp why vertical adjustment is so vital. The RV slide out mechanism relies on a precise alignment to function correctly. The slide out typically moves in and out on a series of tracks, rollers, and gears. When the slide out is vertically misaligned, it puts undue stress on these components. This can result in:
- Uneven Wear: Misalignment causes uneven pressure on the tracks and rollers, leading to accelerated wear and tear.
- Binding and Sticking: A vertically misaligned slide out may bind or stick during operation, making it difficult to extend or retract.
- Water Leaks: Improper sealing due to misalignment can allow water to penetrate the slide out, causing damage to the interior and exterior.
- Damage to the Slide Out Walls: Repeated misalignment can warp or damage the walls of the slide out.
- Premature Failure: Ultimately, consistent misalignment can lead to the premature failure of the slide out mechanism, requiring costly repairs or replacement.
Regular inspection and timely vertical adjustments are critical to preventing these issues and ensuring the longevity of your RV slide out.
Identifying the Need for Vertical Adjustment
The first step is recognizing when a vertical adjustment is necessary. Several telltale signs indicate your RV slide out may require attention. Be proactive and address these issues before they escalate into more significant problems.
- Uneven Gaps: Examine the gaps between the slide out and the RV body. If the gaps are inconsistent (wider in some areas than others), this is a strong indicator of vertical misalignment.
- Binding or Sticking: Difficulty extending or retracting the slide out, accompanied by grinding noises or jerky movements, suggests a problem.
- Excessive Noise: Unusual noises during slide out operation, such as squealing, popping, or grinding, can indicate misalignment.
- Water Leaks: Water intrusion around the slide out seals, especially after rain or washing, is a serious warning sign.
- Difficulty Closing the Slide Out: If the slide out struggles to close completely, or if the seals don’t compress evenly, vertical adjustment may be necessary.
Regular inspections are key. Inspect your RV slide out after each trip and at least every few months, even if you don’t use it frequently. This proactive approach can help you catch problems early and prevent major repairs.
Tools and Materials You’ll Need
Before you begin the vertical adjustment process, gather the necessary tools and materials. Having everything on hand will streamline the process and ensure you’re prepared for any challenges.
- Level: A reliable level is essential for verifying the alignment of your RV slide out. A long, accurate level is recommended.
- Wrench Set: You’ll need a set of wrenches to loosen and tighten the bolts and fasteners that secure the slide out mechanism. The specific sizes will vary depending on your RV model, so a comprehensive set is recommended.
- Socket Set: Similar to wrenches, a socket set will be necessary for some adjustments.
- Lubricant: A high-quality lubricant, specifically designed for RV slide outs, is crucial for lubricating the tracks, rollers, and gears.
- Measuring Tape: A measuring tape will help you assess the gaps and ensure accurate adjustments.
- Safety Glasses: Always wear safety glasses to protect your eyes from debris.
- Work Gloves: Work gloves will protect your hands and provide a better grip.
- Owner’s Manual: Your RV’s owner’s manual is an invaluable resource. It will provide specific instructions and diagrams for your RV slide out model.
Having the right tools and materials will make the adjustment process much smoother and safer.
Step-by-Step Vertical Adjustment Guide
The specific steps for vertical adjustment will vary depending on your RV slide out model. However, the general principles remain the same. Always consult your owner’s manual for detailed instructions specific to your RV. This guide provides a general overview.
- Preparation: Park your RV on a level surface. Extend the slide out completely. Disconnect the RV from any power source. This is a critical safety precaution.
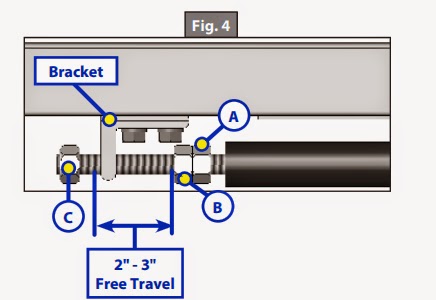
- Locate the Adjustment Points: The adjustment points are typically located on the underside of the slide out mechanism. Consult your owner’s manual to identify the specific location on your RV. These points are often bolts or screws that allow you to raise or lower the slide out.
- Measure the Gaps: Use your measuring tape to measure the gaps between the slide out and the RV body at various points (top, bottom, sides). This will help you determine where adjustments are needed.
- Loosen the Fasteners: Carefully loosen the bolts or screws at the adjustment points. Don’t remove them completely, just loosen them enough to allow for movement.
- Make the Adjustments: Using your wrenches or sockets, make small adjustments to the bolts or screws. Raise or lower the slide out as needed to correct the alignment. Use your level to check the alignment frequently. Small adjustments are key.
- Re-tighten the Fasteners: Once you’ve achieved the desired alignment, carefully re-tighten the bolts or screws. Don’t overtighten them.
- Test the Slide Out: Extend and retract the slide out several times to ensure it operates smoothly and the gaps are consistent. Listen for any unusual noises.
- Lubricate the Mechanism: Apply lubricant to the tracks, rollers, and gears according to the manufacturer’s instructions. This will ensure smooth operation and extend the lifespan of the components.
- Final Inspection: Once the slide out is fully retracted, re-inspect the gaps and alignment. Make any final adjustments as needed.
Patience and precision are key to successfully adjusting your RV slide out. Take your time and don’t be afraid to make small adjustments until you achieve the desired results.
Troubleshooting Common Issues
Even with careful adjustments, you may encounter some common issues. Here are some troubleshooting tips:
- Slide Out Won’t Extend or Retract: Check the power source and the slide out motor. Make sure the slide out is not obstructed. Consult your owner’s manual for troubleshooting steps specific to your model.
- Slide Out Binds or Sticks: Lubricate the tracks and rollers. Check for any obstructions. If the problem persists, you may need to adjust the vertical alignment.
- Uneven Gaps: If the gaps are inconsistent, you’ll need to adjust the vertical alignment. Refer to the steps above.
- Water Leaks: Inspect the slide out seals for damage. Replace any damaged seals. If the leaks persist, you may need to adjust the vertical alignment.
- Excessive Noise: Lubricate the mechanism. Check for any worn or damaged components. If the noise continues, adjust the vertical alignment.
If you’re unsure about any aspect of the adjustment process, it’s always best to consult a qualified RV technician. They have the expertise and tools to diagnose and repair any issues with your RV slide out.
Preventative Maintenance for Your RV Slide Out
Preventative maintenance is the best way to keep your RV slide out operating smoothly and avoid costly repairs. Here are some essential maintenance tips:
- Regular Lubrication: Lubricate the tracks, rollers, and gears at least twice a year, or more frequently if you use your RV frequently.
- Inspect Seals: Inspect the slide out seals regularly for damage or wear. Replace any damaged seals promptly.
- Clean the Slide Out: Keep the slide out clean and free of debris. Wipe down the tracks and rollers regularly.
- Avoid Overloading: Don’t overload the slide out with heavy items.
- Operate Carefully: Operate the slide out slowly and carefully. Avoid forcing it open or closed.
- Check for Obstructions: Before extending or retracting the slide out, check for any obstructions, such as branches, rocks, or other objects.
- Level Your RV: Always park your RV on a level surface before extending or retracting the slide out.
Following these preventative maintenance tips will help you keep your RV slide out in top condition for years to come.
When to Seek Professional Assistance
While this guide provides a comprehensive overview of vertical adjustment, there are times when seeking professional assistance is the best course of action. Here are some situations where you should consult a qualified RV technician:
- Complex Issues: If you’re facing complex issues that you’re not comfortable addressing yourself.
- Major Damage: If your RV slide out has sustained significant damage, such as bent tracks or broken components.
- Mechanical Failures: If the slide out motor or other mechanical components are failing.
- Warranty Concerns: If your RV is still under warranty, it’s best to have any repairs performed by a certified technician.
- Lack of Expertise: If you lack the necessary skills or experience to perform the repairs yourself.
A qualified RV technician has the expertise, tools, and parts to diagnose and repair any issues with your RV slide out. They can also provide valuable advice on preventative maintenance and ensure your slide out operates safely and efficiently.
Conclusion: Keeping Your RV Slide Out in Top Condition
Maintaining your RV slide out is essential for enjoying the full potential of your RV. By understanding the importance of vertical adjustment, knowing how to identify the need for adjustment, and following the step-by-step guide, you can keep your slide out operating smoothly and prevent costly repairs. Remember to always consult your owner’s manual and seek professional assistance when needed. With proper care and attention, your RV slide out will provide years of reliable service, enhancing your RVing experience.
[See also: How to Winterize Your RV Slide Out, RV Slide Out Troubleshooting Guide, Best RV Slide Out Lubricants]

