
Remove Iron-On Patches: A Beginner’s Guide to Effortless Patch Removal
Iron-on patches are a fantastic way to personalize clothing, repair minor damages, and showcase your interests. From band logos on denim jackets to team emblems on sports apparel, these patches offer a quick and easy customization option. However, situations arise where you might need to remove an iron-on patch. Perhaps a design no longer suits your style, or the garment itself needs a refresh. Whatever the reason, the process of removing iron-on patches can seem daunting, especially for beginners. This comprehensive guide provides a step-by-step approach to safely and effectively remove iron-on patches without damaging your clothing. We’ll cover the necessary tools, techniques, and precautions to ensure a successful patch removal experience.
Remove iron-on patches is a skill that’s useful for anyone who enjoys customizing or repurposing their clothes. This guide equips you with the knowledge and confidence to tackle this task head-on, preventing costly mistakes and preserving the integrity of your garments.
Understanding Iron-On Patch Adhesives
Before diving into the removal process, it’s crucial to understand the adhesive used to attach iron-on patches. Most iron-on patches utilize a heat-activated adhesive, typically a thermoplastic polymer. This adhesive melts when exposed to high temperatures, creating a bond with the fabric. The strength of this bond depends on several factors, including the type of fabric, the temperature applied, and the duration of heat exposure. Knowing how this adhesive works is key to understanding how to remove iron-on patches effectively.
Different types of fabrics react differently to heat. Delicate fabrics like silk and rayon require more care and gentler removal methods. Sturdy fabrics like denim and cotton can withstand higher temperatures and more aggressive techniques. The adhesive itself can also vary in quality, with some patches using stronger adhesives than others. This understanding will help you choose the right method for your specific situation.
Gathering Your Supplies: What You’ll Need
Having the right tools and supplies is essential for a successful remove iron-on patches operation. Here’s a list of what you’ll need:
- Iron: A standard household iron is the primary tool. Make sure it has adjustable heat settings.
- Ironing Board or Heat-Resistant Surface: Provides a stable and safe surface for ironing.
- Patience: Removing patches takes time and care.
- Tweezers or a Seam Ripper: For lifting edges and removing adhesive.
- Fabric Scraps: For testing your chosen method on a similar fabric.
- White Vinegar (Optional): Can help loosen stubborn adhesives.
- Goo Gone or Adhesive Remover (Optional): For removing any remaining adhesive residue. Test on an inconspicuous area first.
- Thin Cloth or Pressing Cloth: Protects the fabric from direct heat.
- Needle and Thread (Optional): For repairing any minor damage after patch removal.
Step-by-Step Guide to Removing Iron-On Patches
Now, let’s get into the practical steps to remove iron-on patches. Follow these instructions carefully to minimize the risk of damaging your garment:
Step 1: Prepare Your Workspace
Set up your ironing board or heat-resistant surface in a well-lit area. Ensure your iron is clean and free of any residue that could transfer onto your fabric. Gather all your supplies within easy reach.
Step 2: Test the Method
Before applying any heat or chemicals to your garment, test your chosen method on a fabric scrap that is similar to the garment’s material. This will help you gauge the appropriate heat setting and technique to prevent damage.
Step 3: Heat and Lift (The Primary Method)
This is the most common and often most effective method. Here’s how it works:
- Heat the Iron: Set your iron to a medium-high heat setting. Refer to the garment’s care label for the recommended temperature.
- Protect the Fabric: Place the thin cloth or pressing cloth over the patch and the surrounding fabric. This will protect the garment from direct heat and potential scorching.
- Apply Heat: Place the heated iron on the cloth-covered patch. Apply gentle pressure and hold for 15-30 seconds. The time may vary depending on the adhesive and fabric.
- Lift the Edge: Using tweezers or a seam ripper, carefully lift the edge of the patch. Work slowly and gently to avoid tearing the fabric.
- Continue Heating and Lifting: Continue heating small sections of the patch and lifting the edges until the entire patch is removed.
Step 4: Using White Vinegar (For Stubborn Adhesives)
If the patch is proving difficult to remove, white vinegar can help loosen the adhesive. Here’s how:
- Apply Vinegar: Dip a cotton swab in white vinegar and gently apply it to the edges of the patch.
- Let it Soak: Allow the vinegar to soak into the adhesive for a few minutes.
- Repeat Steps 3 and 4: Follow the heating and lifting steps described above, using the tweezers or seam ripper to carefully lift the edges.
Step 5: Adhesive Residue Removal
Once the patch is removed, some adhesive residue might remain. Here’s how to deal with it:
- Heat and Scrape: Use the iron and pressing cloth to gently heat the residue. Then, use a dull knife or scraper to carefully remove the softened adhesive.
- Use Adhesive Remover: If the residue persists, apply a small amount of Goo Gone or another adhesive remover to the affected area. Follow the product’s instructions. Test on an inconspicuous area first.
Step 6: Inspect and Repair
After removing the patch and adhesive, inspect the area for any damage. If there are small holes or tears, use a needle and thread to repair them. You can also consider adding a new patch to cover any imperfections.
Alternative Methods for Removing Iron-On Patches
While the heat and lift method is generally the most effective, a few alternative approaches can be used, particularly for specific situations:
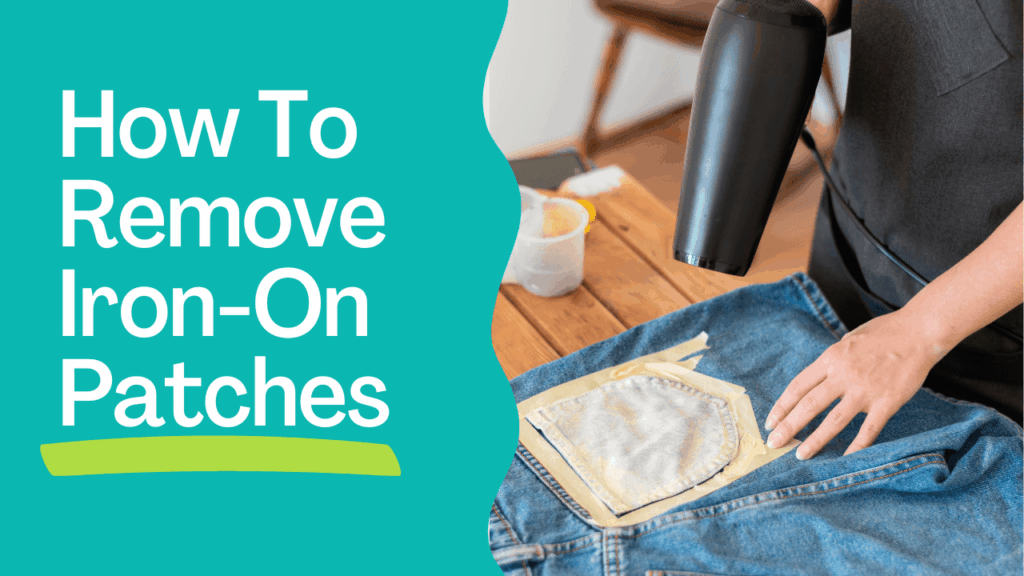
Using a Hair Dryer
A hair dryer can be used as an alternative to an iron, especially for delicate fabrics. Set the hair dryer to a high heat setting and direct the airflow onto the patch for several minutes. Then, use tweezers or a seam ripper to carefully lift the edges. This method is gentler but may take longer.
Freezing Method
Some adhesives become brittle when frozen. Place the garment in the freezer for a few hours. Once frozen, try to peel off the patch using tweezers or a seam ripper. This method is not always effective but can be worth a try, particularly for patches with very strong adhesives.
Tips for Success and Avoiding Common Mistakes
Successfully removing iron-on patches requires patience and attention to detail. Here are some tips to increase your chances of success and avoid common pitfalls:
- Test in an Inconspicuous Area: Always test your chosen method on a hidden area of the garment or a fabric scrap before proceeding.
- Work Slowly: Rushing the process can lead to tearing the fabric. Take your time and be gentle.
- Avoid Overheating: Excessive heat can scorch the fabric or melt the adhesive, making it harder to remove.
- Use the Right Tools: Make sure you have the necessary tools, especially a sharp seam ripper or fine-tipped tweezers for lifting the patch edges.
- Clean the Area: After removing the patch and adhesive, clean the area thoroughly to remove any residue.
Fabric Considerations: What to Expect
The type of fabric will significantly impact how easy or difficult it is to remove iron-on patches. Here’s a quick guide to what you can expect:
- Denim: Denim is generally very durable and can withstand higher heat. Removing patches from denim is usually straightforward.
- Cotton: Cotton is also relatively durable. Use a medium-high heat setting.
- Polyester: Polyester can be sensitive to heat. Use a lower heat setting and be cautious to avoid melting the fabric.
- Silk/Rayon: These delicate fabrics require the utmost care. Use a low heat setting and consider using a hair dryer instead of an iron.
- Leather/Suede: Removing patches from leather or suede can be tricky. It is best to consult a professional.
Understanding the fabric’s properties will help you choose the right method and avoid damaging the garment.
When to Seek Professional Help
While this guide provides comprehensive instructions, there are times when seeking professional help is the best course of action. If you are dealing with:
- Delicate or Expensive Fabrics: If you are unsure about the fabric’s sensitivity, it’s better to consult a professional dry cleaner or tailor.
- Very Stubborn Patches: If the patch is firmly adhered and not responding to your efforts, a professional may have specialized tools and techniques.
- High-Value Garments: If the garment has significant sentimental or monetary value, it’s wise to entrust the job to a professional to avoid any accidental damage.
Conclusion: Removing Iron-On Patches with Confidence
Removing iron-on patches can be a manageable task with the right knowledge and tools. This beginner’s guide has provided a detailed overview of the process, from understanding the adhesive to selecting the appropriate techniques and precautions. By following these steps, you can confidently remove iron-on patches and refresh your wardrobe. Remember to be patient, careful, and test your method on a fabric scrap before applying it to your garment. With practice, you’ll become proficient in this useful skill, opening up new possibilities for customization and garment care. Now go forth and remove iron-on patches with confidence!
[See also: How to Sew a Patch on Clothes; Best Fabric for Patches; Patch Design Ideas]

