Level Up Your Reporting: Master the Art of Inserting Calculated Fields in Pivot Tables
In the data-driven world, the ability to extract meaningful insights from raw data is a critical skill. Pivot tables, a powerful feature in spreadsheet software like Microsoft Excel and Google Sheets, allow users to summarize and analyze large datasets quickly. However, the real power of pivot tables often lies hidden – in the capability to create calculated fields. This article dives deep into the art of inserting calculated fields in pivot tables, empowering you to transform basic reports into sophisticated analyses. We’ll explore the ‘why’ and ‘how’ of this essential technique, providing you with the knowledge to elevate your reporting and decision-making capabilities.
The Power of Calculated Fields: Beyond Basic Summarization
Pivot tables are fantastic for summarizing data, but they can be limited if you need to perform calculations beyond simple sums, counts, averages, or percentages. This is where calculated fields come into play. A calculated field allows you to create new columns of data within your pivot table based on existing fields, applying formulas and calculations to reveal hidden trends, relationships, and performance metrics. Think of it as adding a layer of intelligence to your data analysis.
Imagine you’re analyzing sales data. While a standard pivot table can show you total sales per product, a calculated field could instantly reveal the profit margin for each product by subtracting the cost of goods sold (COGS) from the sales revenue. Or, in a marketing context, you could calculate the conversion rate from website visitors to leads. The possibilities are virtually limitless, making calculated fields an indispensable tool for anyone working with data.
Understanding the Core Concepts: Fields, Formulas, and Functions
Before you begin creating calculated fields, it’s essential to grasp the fundamental concepts. Let’s break it down:
- Fields: These are the columns from your source data that you include in your pivot table. For example, ‘Sales Revenue,’ ‘COGS,’ ‘Website Visitors,’ and ‘Leads’ are all examples of fields.
- Formulas: These are the mathematical expressions you use to define your calculated field. Formulas can include basic arithmetic operators (+, -, *, /), as well as more complex functions.
- Functions: Excel and Google Sheets provide a wide array of built-in functions that you can use within your formulas. These functions perform specific calculations, such as SUM, AVERAGE, COUNT, IF, and many more. Understanding these functions is key to unlocking the full potential of calculated fields.
The beauty of calculated fields is their flexibility. You can tailor them to your specific needs, creating custom metrics that provide unique insights into your data. The key is to understand your data and the calculations you need to perform to extract the information you seek.
Step-by-Step Guide: Creating Calculated Fields in Excel
Let’s walk through the process of creating a calculated field in Microsoft Excel. The steps are generally similar in Google Sheets, with minor interface differences. We’ll use a simplified sales dataset as an example.
- Create Your Pivot Table: First, you need to create a pivot table from your source data. Select your data range, go to the ‘Insert’ tab, and click ‘PivotTable.’ Choose where you want the pivot table to appear (e.g., a new worksheet or the existing one).
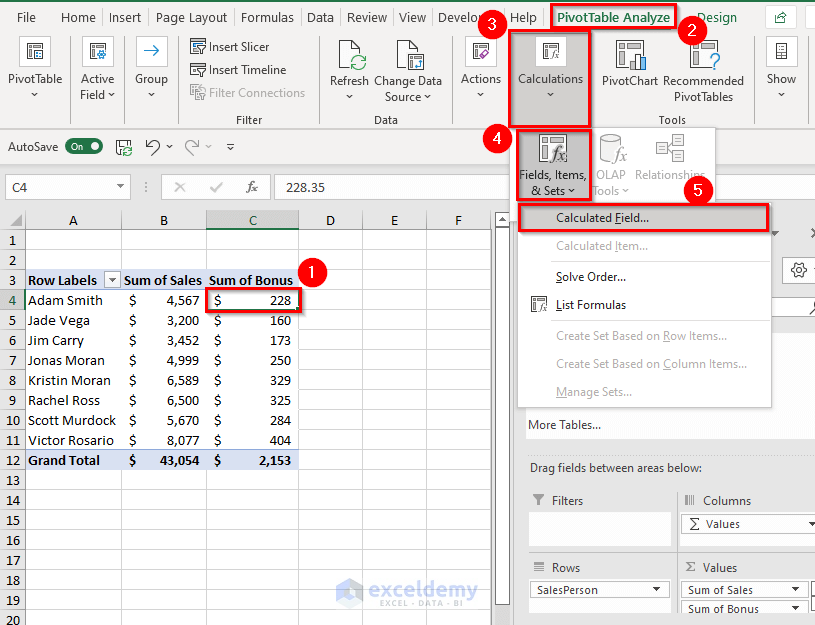
- Access the Calculated Field Feature: In the ‘PivotTable Analyze’ (or ‘PivotTable Options’ in older versions) tab on the ribbon, you’ll find a ‘Calculations’ group. Click on ‘Fields, Items, & Sets’ and then select ‘Calculated Field…’
- Name Your Calculated Field: A dialog box will appear. In the ‘Name’ field, give your calculated field a descriptive name. For example, if you’re calculating profit margin, you might name it ‘Profit Margin.’
- Enter Your Formula: In the ‘Formula’ box, enter the formula for your calculation. This is where you’ll use your fields and functions. For example, to calculate profit margin (Sales Revenue – COGS) / Sales Revenue, you’d enter something like:
= ('Sales Revenue' - 'COGS') / 'Sales Revenue'. Make sure to use the exact field names from your source data. Double-click on fields in the ‘Fields’ list to insert them into the formula. - Format Your Calculated Field (Optional): After creating the field, you might need to format it to display the results correctly. For instance, if you’re calculating a percentage, format the cell as a percentage.
- Click ‘OK’: Once you’ve entered your formula and named your field, click ‘OK.’ The calculated field will now appear in your pivot table, ready for analysis.
Remember to double-check your formulas for accuracy and ensure the field names are correct. Experiment with different calculations to explore the full potential of your data.
Creating Calculated Fields in Google Sheets: A Similar Approach
The process in Google Sheets is very similar to Excel, with a few interface differences. Here’s how to create a calculated field:
- Create Your Pivot Table: Select your data range and go to ‘Data’ > ‘Pivot table’. Choose where to place the pivot table.
- Access Calculated Field: In the Pivot table editor (usually on the right), click on ‘Add’ under ‘Values’. Select ‘Calculated field’.
- Enter Your Formula: A formula editor will appear. Enter your formula using field names and functions. Google Sheets offers a helpful list of fields that you can directly include in the formula.
- Format Your Calculated Field (Optional): After creating the field, you can format it by selecting the field in the ‘Values’ section and adjusting the formatting options.
- Click ‘Add’: Click ‘Add’ when finished.
While the steps are similar, the interface might feel slightly different. Take some time to familiarize yourself with the Google Sheets pivot table interface.
Advanced Techniques: Leveraging Functions and Nested Calculations
Once you’re comfortable with basic calculated fields, you can delve into more advanced techniques. This involves leveraging the power of Excel and Google Sheets functions and using nested calculations.
- Using Functions: Excel and Google Sheets offer a vast library of functions, including logical functions (IF, AND, OR), statistical functions (AVERAGEIF, COUNTIF), and text functions (LEFT, RIGHT, MID). Using these functions within your calculated fields allows for complex calculations. For instance, you could use an IF function to categorize sales based on their value.
- Nested Calculations: You can create calculations within calculations. For example, you could first calculate a discount amount and then calculate the discounted price using the discount amount. This approach allows for intricate analysis, but it’s crucial to keep your formulas organized and easy to understand.
- Conditional Formatting: Enhance the visual impact of your pivot tables by using conditional formatting. This allows you to highlight specific data points based on the values in your calculated fields. For example, you could highlight profit margins below a certain threshold.
Mastering these advanced techniques will significantly enhance your data analysis capabilities.
Troubleshooting Common Issues with Calculated Fields
Even experienced users can encounter issues when working with calculated fields. Here are some common problems and how to solve them:
- Formula Errors: The most common problem is a formula error. Double-check your formula for typos, incorrect field names, and missing parentheses. Excel and Google Sheets usually provide error messages that can help you identify the issue.
- Incorrect Results: If your results seem off, verify that your formula is correct and that the field names match the source data exactly. Also, check the formatting of your calculated field (e.g., ensure you’re using the correct number format).
- Field Not Appearing: Sometimes, the calculated field doesn’t appear in the pivot table. Ensure that you’ve added the field to the ‘Values’ section of your pivot table.
- Data Type Mismatches: Be mindful of data types. If you’re trying to perform a calculation on text data, it might not work. Ensure that your fields are in the correct data format (e.g., numbers for calculations).
Patience and attention to detail are key to troubleshooting issues with calculated fields.
Real-World Applications: Examples of Calculated Fields in Action
Let’s explore some real-world examples to illustrate the practical applications of calculated fields:
- Sales Analysis: Calculate profit margin, sales growth, and average transaction value.
- Marketing Analysis: Calculate conversion rates, cost per acquisition (CPA), and return on investment (ROI).
- Financial Analysis: Calculate gross profit, operating expenses, and net income.
- Human Resources: Calculate employee turnover rate, average salary, and training costs per employee.
- Project Management: Calculate project completion rate, cost variance, and schedule variance.
These are just a few examples. The possibilities are endless. The key is to identify the metrics that are most important to your analysis and then use calculated fields to calculate them.
Best Practices for Effective Reporting with Calculated Fields
To maximize the effectiveness of your reporting, follow these best practices:
- Plan Your Calculations: Before you start, carefully plan the calculations you need to perform. Identify the fields you’ll use and the formulas you’ll need.
- Use Descriptive Names: Give your calculated fields descriptive names that clearly indicate what they represent.
- Document Your Formulas: Keep a record of your formulas and the logic behind them. This will help you maintain your reports and troubleshoot any issues.
- Test Your Results: Always test your results to ensure accuracy. Compare your calculations to known values to verify that they are correct.
- Keep It Simple: While complex calculations are possible, try to keep your formulas as simple as possible. This will make them easier to understand and maintain.
- Regularly Update Your Data: Ensure your source data is up-to-date to keep your pivot tables and calculated fields accurate.
By following these best practices, you can ensure that your reports are accurate, insightful, and easy to understand.
Conclusion: Embrace the Power of Calculated Fields
Inserting calculated fields in pivot tables is a powerful technique that can transform your data analysis capabilities. By mastering the core concepts, understanding the steps involved, and exploring advanced techniques, you can unlock the full potential of your data. Remember to plan your calculations, use descriptive names, and test your results. With practice and a little bit of patience, you’ll be able to create sophisticated reports that provide valuable insights and inform your decision-making.
By adding calculated fields, you elevate your reporting from basic summaries to actionable intelligence. This skill is invaluable for anyone working with data, regardless of their industry or role.
[See also: Related Article Titles]

