
Keep Your RV Looking New: Black Streak Removal Secrets
The open road beckons, promising adventure and the freedom of travel. For RV enthusiasts, the joy of exploring new landscapes is often coupled with the responsibility of maintaining their home on wheels. One of the most common and persistent challenges RV owners face is the unsightly presence of black streaks. These streaks, often caused by a combination of environmental factors and the materials used in RV construction, can detract from the aesthetic appeal of your rig and even potentially damage the exterior over time. This article delves into the secrets of effective black streak removal, equipping you with the knowledge and techniques to keep your RV looking its best and preserving its value. The focus is on how to keep your RV looking new.
Understanding the Culprit: What Causes Black Streaks?
Before diving into the solutions, it’s crucial to understand the root causes of these unsightly marks. Black streaks are primarily formed by a combination of factors, each contributing to the accumulation of grime and discoloration on your RV’s exterior. These streaks are a constant battle for anyone who wants to keep their RV looking new.
One major contributor is the roof of your RV. Rainwater, especially when combined with dirt, dust, and organic debris like leaves and pollen, washes down the sides of your RV. As the water flows, it picks up these contaminants, which then adhere to the exterior surfaces, leaving behind dark streaks. The type of roofing material also plays a role; older RVs with rubber roofs are often more prone to streaking because the roof material itself can degrade over time, releasing particles that contribute to the problem. This is something to consider if you want to keep your RV looking new.
Another significant factor is the composition of your RV’s exterior. Many RVs are made with fiberglass or aluminum siding. These materials, while durable, can also accumulate dirt and grime. Furthermore, the sealants and adhesives used in the construction of your RV, especially around windows, vents, and seams, can break down over time. As these sealants degrade, they release particles that contribute to black streaks. Understanding these factors is the first step in learning how to keep your RV looking new.
Finally, environmental factors such as UV exposure, air pollution, and road grime can exacerbate the problem. UV rays can break down the surface of your RV’s exterior, making it more susceptible to dirt and grime accumulation. Air pollution, including exhaust fumes and industrial pollutants, can also contribute to the formation of black streaks. Road grime, kicked up by passing vehicles, adds another layer of dirt and debris to the equation. To really keep your RV looking new, you need to address these environmental factors.
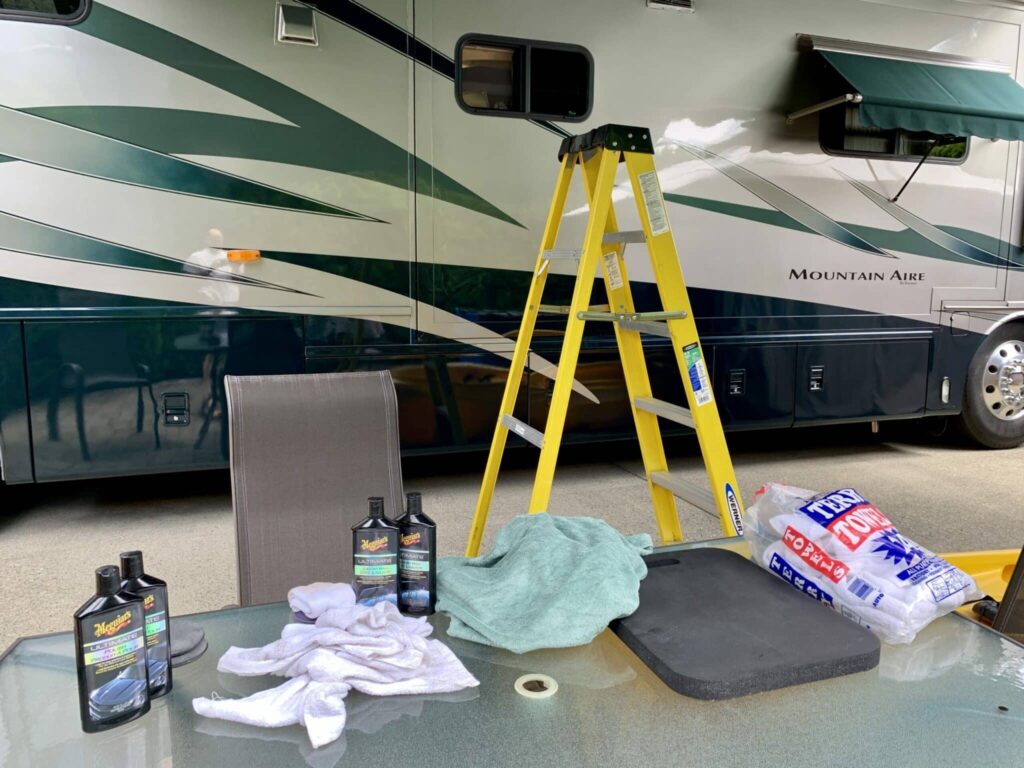
Essential Tools and Supplies for Black Streak Removal
Successfully removing black streaks requires the right tools and supplies. While the specifics may vary depending on the severity of the streaks and the materials of your RV, the following items are essential:
- RV-Specific Cleaner: Choose a cleaner specifically formulated for RV exteriors. These cleaners are designed to be gentle on the materials of your RV while effectively removing dirt and grime. Many are also designed to help you keep your RV looking new.
- Soft-Bristled Brush: A soft-bristled brush is crucial for gently scrubbing the exterior of your RV without causing scratches.
- Microfiber Towels: Microfiber towels are ideal for wiping away the cleaner and drying the RV’s surface. They are soft, absorbent, and won’t scratch the paint.
- Bucket: A bucket is needed to mix the cleaning solution and rinse your brush and towels.
- Water Source: You’ll need a hose and access to water for rinsing the RV.
- Ladder (If Necessary): Depending on the height of your RV, you may need a ladder to reach the roof and upper sections of the exterior.
- Protective Gloves: Protect your hands with gloves while working with cleaning chemicals.
Having these tools will help you to keep your RV looking new.
Step-by-Step Guide to Black Streak Removal
Now that you have the necessary supplies, let’s get down to the practical steps of black streak removal:
- Preparation: Park your RV in a shaded area to prevent the cleaning solution from drying too quickly. Rinse the entire RV with water to remove loose dirt and debris. This is the first step in your journey to keep your RV looking new.
- Mixing the Cleaning Solution: Follow the manufacturer’s instructions to mix the RV cleaner with water in your bucket. The concentration of the solution may vary depending on the severity of the streaks.
- Applying the Cleaner: Apply the cleaning solution to a small section of your RV’s exterior, starting at the bottom and working your way up. This helps prevent the solution from drying before you can scrub it.
- Scrubbing the Surface: Using your soft-bristled brush, gently scrub the surface of the RV, focusing on areas with black streaks. Work in small sections to ensure thorough cleaning.
- Rinsing Thoroughly: Rinse the cleaned section with water, ensuring that all traces of the cleaning solution are removed.
- Drying the Surface: Use microfiber towels to dry the cleaned section. This will help prevent water spots and give your RV a polished look.
- Repeat: Repeat steps 3-6 for the remaining sections of your RV’s exterior.
Following these steps will help you effectively keep your RV looking new.
Advanced Techniques and Tips for Stubborn Streaks
Some black streaks may be more stubborn and require additional techniques. Here are some advanced tips for tackling particularly persistent marks:
- Specialized Cleaners: For stubborn streaks, consider using a specialized black streak remover. These cleaners are often more concentrated and designed to tackle tougher stains.
- Spot Treatment: Apply the cleaning solution directly to the affected areas and allow it to sit for a few minutes before scrubbing.
- Gentle Abrasives (Use with Caution): For very stubborn streaks, you might consider using a gentle abrasive, such as a polishing compound. However, use this with extreme caution and test it in an inconspicuous area first, as it could potentially damage the finish of your RV.
- Clay Bar Treatment: A clay bar can be used to remove embedded contaminants from the surface of your RV. This can be particularly effective for removing black streaks that have been present for a long time.
- Waxing or Sealing: After cleaning your RV, consider applying a wax or sealant to protect the exterior and prevent future black streaks. This will also help you keep your RV looking new for longer.
Preventative Measures: Keeping Black Streaks at Bay
While removing black streaks is important, preventing them in the first place is even better. Here are some preventative measures you can take:
- Regular Washing: Wash your RV regularly, at least every few months, or more frequently if you travel in areas with heavy pollution or road grime.
- Roof Maintenance: Inspect your RV’s roof regularly for any signs of damage or degradation. Repair any damage promptly to prevent leaks and the formation of black streaks.
- Sealant Inspection: Inspect the sealants around windows, vents, and seams regularly. Re-seal any areas where the sealant is cracked or missing.
- Waxing or Sealing: Applying a wax or sealant to your RV’s exterior creates a protective barrier that helps repel dirt, grime, and UV rays.
- Covering Your RV: When storing your RV for extended periods, consider covering it with a protective cover. This can help shield the exterior from the elements and prevent the formation of black streaks. This proactive approach will help you keep your RV looking new.
Choosing the Right Products: A Guide to RV Cleaners
The market is flooded with RV cleaners. Selecting the right product can be overwhelming. Here’s a guide to help you choose the best cleaner for your needs:
- Read Reviews: Before purchasing any RV cleaner, read reviews from other RV owners. This can provide valuable insights into the product’s effectiveness and ease of use.
- Consider the Material of Your RV’s Exterior: Some cleaners are specifically formulated for fiberglass, while others are designed for aluminum. Choose a cleaner that is compatible with the materials of your RV.
- Check the pH Level: Avoid cleaners with a high pH level, as they can be harsh on your RV’s exterior.
- Look for UV Protection: Some RV cleaners contain UV protectants that can help prevent fading and damage from the sun.
- Consider Environmental Friendliness: If you’re concerned about the environment, look for cleaners that are biodegradable and phosphate-free.
Using the right products is a key step in the process of how to keep your RV looking new.
Common Mistakes to Avoid
While cleaning your RV, it’s easy to make mistakes that can damage its exterior. Here are some common pitfalls to avoid:
- Using Harsh Chemicals: Avoid using household cleaners, as they can be too harsh and damage your RV’s finish.
- Using Abrasive Scrubbing Pads: These can scratch the paint and leave your RV looking worse than before.
- Cleaning in Direct Sunlight: This can cause the cleaning solution to dry too quickly, leaving streaks and making it difficult to remove dirt and grime.
- Ignoring the Roof: The roof is a major source of black streaks, so don’t forget to clean it.
Avoiding these mistakes will help you to keep your RV looking new.
The Long-Term Benefits of RV Maintenance
Maintaining your RV’s exterior is about more than just aesthetics. It’s also about preserving its value and protecting your investment. Regular cleaning and maintenance can:
- Increase Resale Value: A well-maintained RV will always fetch a higher price when it’s time to sell.
- Prevent Damage: Removing dirt and grime helps prevent corrosion and other types of damage.
- Extend the Life of Your RV: Proper maintenance can help extend the life of your RV and keep it running smoothly for years to come.
- Enhance Your Enjoyment: A clean and well-maintained RV is more enjoyable to use and makes for a more pleasant travel experience.
Taking care of your RV allows you to keep your RV looking new and enjoy it for years to come.
Conclusion: The Path to a Pristine RV
Black streaks are an inevitable part of RV ownership, but they don’t have to be a constant source of frustration. By understanding the causes of black streaks, using the right tools and techniques, and implementing preventative measures, you can keep your RV looking new, preserving its value and enhancing your enjoyment of the open road. Regular cleaning, appropriate product selection, and a proactive approach are key to maintaining your RV’s pristine condition and ensuring it remains a source of pride for years to come. The journey to keep your RV looking new is a rewarding one. So, grab your cleaning supplies, follow the steps outlined in this guide, and enjoy the satisfaction of a sparkling RV ready for your next adventure.
[See also: How to Winterize Your RV: A Comprehensive Guide]
[See also: Top RV Camping Destinations in the United States]
[See also: RV Roof Maintenance: Tips and Tricks for Longevity]

