How to Repaint a Filing Cabinet: Achieving a Professional Look at Home
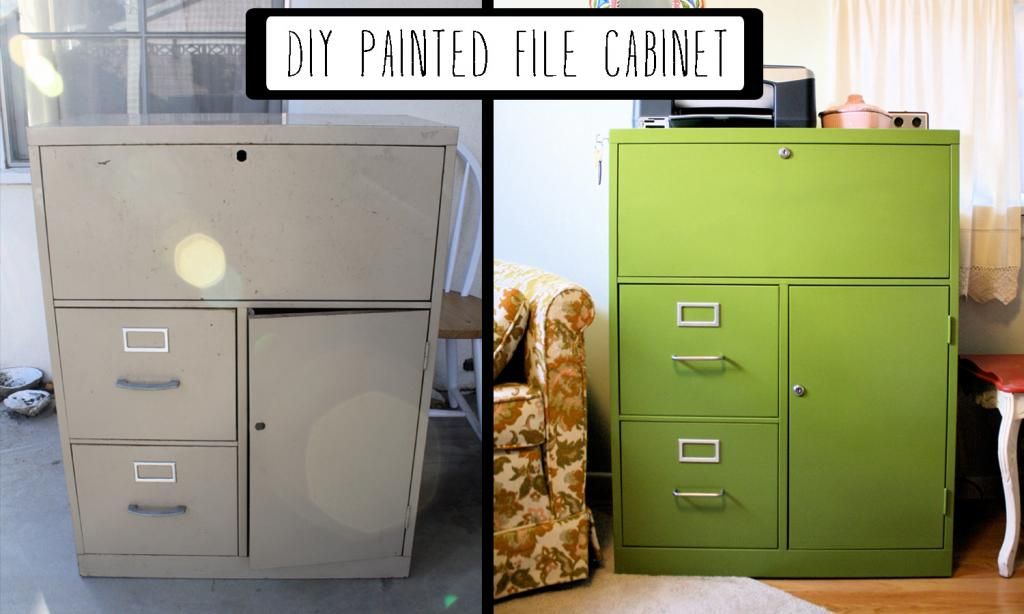
The humble filing cabinet: a ubiquitous office staple, often relegated to the shadows, holding the secrets (and the clutter) of our professional lives. But what if this workhorse of organization could also be a statement piece? The answer, my friends, lies in a fresh coat of paint. Learning how to repaint a filing cabinet is a surprisingly rewarding project, offering a cost-effective way to revitalize your workspace and inject a dose of personality. This guide provides expert tips to ensure a flawless, professional-looking finish, transforming that drab metal box into something you’ll be proud to display.
Repainting a filing cabinet isn’t just about aesthetics; it’s a chance to breathe new life into a functional object. Whether you’re tired of the institutional gray, want to match your office decor, or simply enjoy a good DIY project, the process is achievable for even novice painters. This comprehensive guide will walk you through every step, from preparation to the final coat, ensuring your filing cabinet repaint is a resounding success. We’ll cover the essential tools, the best paint choices, and the techniques that separate a good paint job from a great one. The goal is to equip you with the knowledge and confidence to tackle this project with enthusiasm, ultimately achieving a result that looks professionally done.
Preparing Your Filing Cabinet: The Foundation of a Great Paint Job
Before you even think about picking up a paintbrush, the key to a successful filing cabinet repaint lies in meticulous preparation. Skipping these crucial steps can lead to a finish that chips, peels, and looks anything but professional. Proper preparation ensures the paint adheres correctly and creates a durable, long-lasting surface. Think of it as the architectural foundation; a strong base is essential for a beautiful and enduring structure.
Disassembly and Cleaning: The First Steps
Begin by emptying the filing cabinet of its contents. Remove the drawers completely. This makes the painting process much easier and allows you to reach every nook and cranny. Take out all hardware like handles, knobs, and any drawer pulls. Store these in a safe place, preferably in a labeled bag or container, to avoid losing them. This is also a good opportunity to clean the inside of the drawers and the cabinet itself.
Next, give the entire cabinet a thorough cleaning. Use a degreasing cleaner specifically designed for metal surfaces. This removes any dirt, grime, grease, or residue that might interfere with paint adhesion. Pay particular attention to areas that are frequently touched, such as the drawer fronts and handles. Rinse the cabinet thoroughly with clean water and let it dry completely. Any lingering residue will compromise the paint’s ability to bond with the metal.
Sanding: Smoothing the Surface
Sanding is a critical step in preparing your filing cabinet for a new coat of paint. It creates a slightly rough surface, known as ‘tooth,’ which allows the paint to adhere properly. Begin with a medium-grit sandpaper (around 120-grit) to remove any existing loose paint, rust, or imperfections. Focus on any areas where the original paint is flaking or peeling. Be sure to sand in the direction of the metal grain, if visible, for the best results.
Once you’ve removed any major flaws, switch to a finer-grit sandpaper (around 220-grit) to smooth the surface and create a more even finish. This removes any sanding scratches left by the coarser grit. Sand the entire cabinet, including the drawers, ensuring a consistent texture. After sanding, wipe down the cabinet with a tack cloth to remove any dust or debris. This is a crucial step; even tiny particles can ruin the smoothness of your paint job. For particularly stubborn areas, consider using a metal-specific sanding block to maintain even pressure.
Priming: The Foundation for a Flawless Finish
Priming is arguably the most important step in the entire process of learning how to repaint a filing cabinet. A primer acts as a bonding agent, creating a surface that the paint can adhere to. It also seals the metal, preventing rust and ensuring a more uniform finish. Choose a primer specifically designed for metal surfaces; look for one that is rust-inhibitive for added protection. Aerosol primers are convenient and easy to apply, but you can also use a brush or roller for larger surfaces.
Apply the primer in thin, even coats. Avoid applying too much primer at once, as this can lead to drips and runs. Allow each coat to dry completely according to the manufacturer’s instructions, usually a few hours. Once the primer is dry, lightly sand it with fine-grit sandpaper (around 320-grit) to smooth any imperfections. Wipe away any sanding dust with a tack cloth before proceeding to the next step. Using a high-quality primer is a non-negotiable part of how to repaint a filing cabinet correctly.
Choosing the Right Paint for Your Filing Cabinet
The type of paint you choose will significantly impact the final look and durability of your filing cabinet repaint. The best options offer excellent adhesion, resistance to wear and tear, and a beautiful finish. Understanding the different types of paint available is crucial for making the right choice.
Paint Types: A Breakdown
Several paint types are suitable for repainting a filing cabinet, each with its own advantages and disadvantages:
- Oil-based paints: Known for their durability and excellent adhesion, oil-based paints provide a hard, glossy finish that is resistant to scratches and stains. However, they take longer to dry, have a strong odor, and require mineral spirits for cleanup.
- Latex paints: Water-based latex paints are a popular choice due to their ease of use, low odor, and quick drying time. They are also easy to clean up with soap and water. However, latex paints may not be as durable as oil-based paints, especially in high-traffic areas. Look for latex paints specifically formulated for metal surfaces.
- Acrylic enamel paints: These paints combine the benefits of both latex and oil-based paints. They offer good durability, water resistance, and a low odor, making them a great all-around choice.
- Spray paints: Spray paints are convenient and provide a smooth, even finish. They come in various formulations, including enamel and acrylic options. Spray paint is ideal for achieving a professional look, especially for filing cabinets with intricate details.
Finishes: Choosing the Right Sheen
The sheen of your paint determines the level of glossiness. Consider these options when planning your filing cabinet repaint:
- Flat: Provides a non-reflective finish, ideal for hiding imperfections. However, it can be more difficult to clean.
- Satin: Offers a low-sheen, elegant finish that is both durable and easy to clean.
- Semi-gloss: Provides a slightly more reflective finish, offering good durability and washability.
- Gloss: Offers a high-shine, highly durable finish that is easy to clean but can highlight imperfections.
For a filing cabinet, satin or semi-gloss finishes are often the best choices, as they offer a balance of durability and aesthetics. The best sheen for your filing cabinet repaint depends on your personal preference and the overall aesthetic you’re aiming for.
The Painting Process: Achieving a Professional Finish
With your filing cabinet prepped and your paint selected, it’s time to get painting. Following these steps will help you achieve a professional-looking finish, transforming your old filing cabinet into a stylish and functional piece of furniture. The key is patience, precision, and attention to detail.
Applying the Paint: Brush, Roller, or Spray?
The method you choose for applying the paint depends on the type of paint you’ve selected and your personal preference. Each method has its advantages and disadvantages:
- Brushing: Brushing is a good option for smaller filing cabinets or when you want precise control. Use a high-quality brush designed for the type of paint you’re using. Apply the paint in thin, even strokes, working in the direction of the metal grain.
- Rolling: Rolling is a good option for larger surfaces and provides a smooth, even finish. Use a small foam roller for a smooth finish. Apply the paint in overlapping strokes, ensuring complete coverage.
- Spraying: Spraying is the best option for achieving a professional-looking finish, especially for filing cabinets with intricate details or curves. Use a spray gun or aerosol spray paint. Apply the paint in thin, even coats, overlapping each pass slightly.
Applying Multiple Coats: Building a Durable Finish
To achieve a durable, long-lasting finish, apply multiple thin coats of paint. Allow each coat to dry completely according to the manufacturer’s instructions before applying the next. This prevents drips, runs, and uneven coverage. Lightly sand between coats with fine-grit sandpaper (around 320-grit) to remove any imperfections and ensure a smooth finish. Wipe away any sanding dust with a tack cloth before applying the next coat. The number of coats required will depend on the paint type and your desired level of coverage, but generally, two to three coats are recommended. This is a crucial part of how to repaint a filing cabinet correctly.
Hardware and Final Touches
Once the final coat of paint is dry, reassemble the filing cabinet. Reattach the handles, knobs, and drawer pulls. If the original hardware is worn or outdated, consider replacing it with new hardware to give your filing cabinet a fresh, updated look. This is a chance to add your personal touch and enhance the overall aesthetic.
After reassembling the cabinet, inspect it carefully for any imperfections. If necessary, touch up any areas that need it. Allow the paint to fully cure, typically for several days, before using the filing cabinet. This will ensure the paint is fully hardened and resistant to scratches and wear. A well-executed filing cabinet repaint will transform your workspace and provide years of enjoyment.
Troubleshooting Common Problems
Even with careful preparation and execution, problems can arise. Here’s how to troubleshoot some common issues you might encounter when learning how to repaint a filing cabinet:
- Runs and Drips: These are often caused by applying too much paint at once. Apply thinner coats and allow each coat to dry completely before applying the next.
- Bubbles: Bubbles can be caused by painting in direct sunlight or on a hot surface. Paint in a shaded area and allow the surface to cool before painting.
- Uneven Finish: This can be caused by applying uneven coats or using a low-quality brush or roller. Use high-quality tools and apply the paint evenly.
- Poor Adhesion: This can be caused by inadequate surface preparation or using the wrong type of primer. Ensure the surface is properly cleaned, sanded, and primed before painting.
- Rust: If rust appears after painting, it’s likely due to insufficient rust removal during the preparation phase. Address any rust thoroughly before priming and painting.
By understanding these potential issues and how to address them, you can increase your chances of a successful filing cabinet repaint.
Beyond the Basics: Advanced Techniques
Once you’ve mastered the basics of how to repaint a filing cabinet, you can explore more advanced techniques to further enhance the look of your project:
- Color Blocking: Use different colors on different parts of the cabinet for a more modern look.
- Stenciling: Add patterns or designs using stencils for a personalized touch.
- Distressed Finish: Create a vintage look by sanding away some of the paint after it’s dry.
- Adding Hardware: Upgrading or customizing the hardware can significantly change the look of the cabinet.
These advanced techniques can add a unique and personalized touch to your filing cabinet, making it a true statement piece.
Conclusion: Transforming Your Workspace
Learning how to repaint a filing cabinet is a rewarding project that can transform your workspace. By following these expert tips, you can achieve a professional-looking finish that will revitalize your office and inject a dose of personality. From meticulous preparation to selecting the right paint and mastering the application techniques, each step contributes to the final result. The process, while requiring attention to detail, is achievable for anyone willing to invest the time and effort.
Remember to prioritize preparation, choose the right paint and finish, and take your time. Don’t be afraid to experiment with different colors and techniques to create a filing cabinet that reflects your personal style. With a little patience and the right guidance, you can transform a mundane office staple into a stylish and functional piece of furniture you’ll be proud to display. The journey of how to repaint a filing cabinet is one that combines practicality with creativity, offering a tangible reward for your efforts.
[See also: How to Paint a Metal Door: A Step-by-Step Guide, Best Paint for Furniture: A Comprehensive Guide, DIY Furniture Makeovers: Transforming Old Pieces]

