
Hard Disk Not Getting Detected: A Deep Dive into Troubleshooting and Data Recovery
The sinking feeling that washes over you when your computer fails to recognize your hard drive is a familiar one for many. Whether it’s a seasoned professional or a casual user, the inability to access your data – from crucial work documents to cherished family photos – can be a major setback. This article provides a comprehensive guide to understanding why your hard disk is not getting detected, offering practical troubleshooting steps and, importantly, data recovery strategies to minimize potential loss.
Understanding the Problem: Why Your Hard Disk Isn’t Showing Up
Before diving into solutions, it’s crucial to understand the underlying causes. A hard disk not getting detected can stem from a variety of issues, ranging from simple connection problems to more complex hardware failures. Pinpointing the root cause is the first step towards a successful resolution.
Connection Issues: The First Line of Defense
Often, the problem is simpler than you might think. Loose or faulty connections are a common culprit when a hard disk is not getting detected. These can include:
- SATA Cable Problems: The Serial ATA (SATA) cable connects the hard drive to the motherboard. Ensure it’s securely plugged into both the hard drive and the motherboard’s SATA port. Try replacing the cable, as a damaged cable can prevent detection.
- Power Cable Issues: The power cable provides the necessary electricity for the hard drive to function. Verify that the power cable is firmly connected to the hard drive and the power supply unit (PSU).
- Port Issues: Sometimes, the SATA port on the motherboard itself may be faulty. Try connecting the hard drive to a different SATA port to see if it’s recognized.
BIOS/UEFI Settings: The Operating System’s Gatekeeper
The Basic Input/Output System (BIOS) or Unified Extensible Firmware Interface (UEFI) is the first software that runs when you start your computer. It’s responsible for initializing hardware components, including your hard drives. If the BIOS/UEFI doesn’t recognize the hard drive, the operating system won’t either. Here’s how to check:
- Accessing the BIOS/UEFI: Restart your computer and, during startup, press the designated key to enter the BIOS/UEFI setup (usually Del, F2, F12, or Esc). The specific key varies depending on your motherboard manufacturer.
- Checking Drive Detection: Within the BIOS/UEFI, navigate to the storage or boot order settings. Verify that your hard disk is listed and recognized. If it isn’t, the BIOS/UEFI might not be configured to detect the drive.
- Enabling the Drive: If the drive is listed but disabled, enable it. If it’s not listed at all, there might be a hardware problem.
Troubleshooting Steps: A Step-by-Step Guide
If the initial checks don’t resolve the issue, proceed with these more advanced troubleshooting steps:
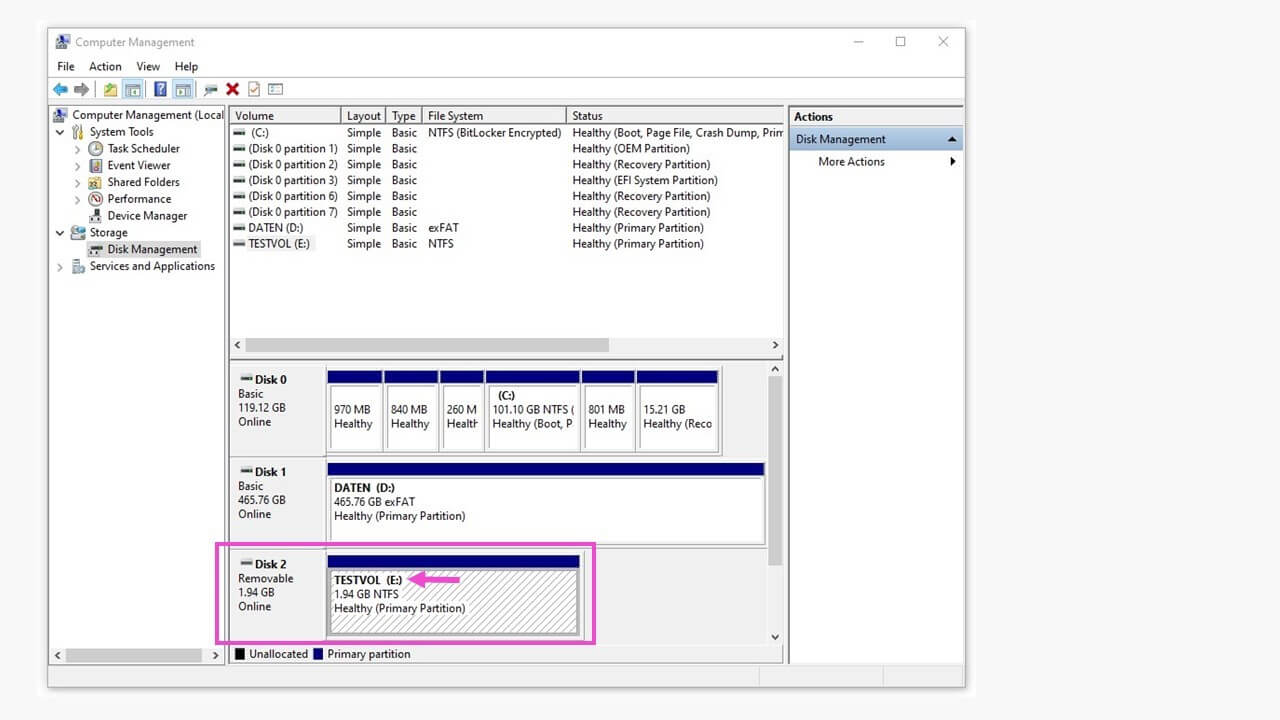
Check Disk Management (Windows)
Windows Disk Management is a built-in utility that allows you to manage hard drives and partitions. Even if the hard disk isn’t showing up in File Explorer, it might be visible here. Here’s how:
- Press the Windows key + R, type
diskmgmt.msc, and press Enter. - In Disk Management, check if the hard disk is listed. If it is, it might be uninitialized, unallocated, or have a drive letter conflict.
- If the drive is listed but uninitialized, right-click on it and select “Initialize Disk.” This will allow you to format and use the hard disk. Be cautious, as this process will erase all data on the drive.
- If the drive is listed but unallocated, create a new partition and format it. This will also erase all data on the drive.
- If there’s a drive letter conflict, assign a new drive letter to the hard disk.
Check Device Manager (Windows)
Device Manager provides a comprehensive view of all hardware devices connected to your computer. It can help identify driver issues or hardware conflicts that might prevent a hard disk from being detected.
- Press the Windows key + R, type
devmgmt.msc, and press Enter. - Expand the “Disk drives” category. Your hard disk should be listed here.
- If there’s a yellow exclamation mark next to the drive, it indicates a driver issue. Right-click on the drive and select “Update driver.” You can either search automatically for updated driver software or browse your computer for driver software.
- If the drive is not listed at all, there might be a hardware issue.
Test the Hard Disk on Another Computer
To determine if the problem lies with the hard disk itself or your computer, try connecting the drive to another computer. If the hard disk is detected on another machine, the issue is likely with your original computer’s hardware or software. If it’s still not detected, the hard disk itself may be faulty.
Check for Physical Damage
Examine the hard disk for any physical damage, such as:
- Visible Damage: Inspect the drive enclosure for cracks, dents, or other signs of physical trauma.
- Damaged Connectors: Check the SATA and power connectors for bent or broken pins.
- Listen for Unusual Noises: Turn on the computer and listen closely to the hard disk. Clicking, grinding, or beeping sounds can indicate a failing drive.
Data Recovery Strategies: When Your Hard Disk Fails
If your hard disk is not getting detected and you suspect data loss, data recovery becomes a priority. The approach depends on the severity of the problem.
Software-Based Data Recovery
If the hard disk is recognized in the BIOS/UEFI but not in the operating system, or if you can’t access data due to logical errors, data recovery software can be a viable option. These tools scan the drive for recoverable files and allow you to copy them to a different storage device. However, it’s crucial to act quickly and avoid writing any new data to the affected drive, as this can overwrite the existing data.
- Popular Data Recovery Software: Recuva, EaseUS Data Recovery Wizard, and Stellar Data Recovery are examples of reputable data recovery software.
- Installation and Usage: Download and install the software on a different computer (not the one with the failing hard disk). Connect the failing hard disk as an external drive or slave drive, and use the software to scan the drive and recover your files.
Professional Data Recovery Services
In cases of severe hardware failure, such as a drive that’s not spinning up, clicking, or experiencing other physical damage, professional data recovery services are often the best option. These services have specialized equipment and expertise to recover data from physically damaged drives. While this is the most expensive option, it offers the best chance of recovering your data.
- Cleanroom Environment: Data recovery companies operate in cleanroom environments to prevent further damage to the drive during the recovery process.
- Advanced Techniques: They employ advanced techniques, such as head replacement and platter imaging, to retrieve data from failing drives.
- Cost Considerations: The cost of professional data recovery depends on the severity of the damage and the complexity of the recovery process.
Preventive Measures: Protecting Your Data
Preventing data loss is just as important as knowing how to recover it. Implementing these preventive measures can help safeguard your valuable data.
- Regular Backups: The most effective way to protect your data is to create regular backups. Back up your data to an external hard drive, cloud storage, or a network-attached storage (NAS) device.
- Use a Solid-State Drive (SSD): SSDs are generally more durable and less susceptible to physical damage than traditional hard drives.
- Monitor Hard Drive Health: Use S.M.A.R.T. (Self-Monitoring, Analysis and Reporting Technology) tools to monitor your hard drive’s health. These tools can provide early warnings of potential failures.
- Protect Against Power Surges: Use a surge protector to protect your computer and hard drives from power surges.
- Handle Your Devices with Care: Avoid dropping your computer or hard drives, and handle them gently.
Conclusion: Navigating the Challenges of a Non-Detected Hard Disk
When your hard disk is not getting detected, it can be a stressful experience, but it’s important to remain calm and follow a systematic approach to troubleshooting. By understanding the potential causes, employing the troubleshooting steps outlined above, and considering data recovery options, you can significantly increase your chances of resolving the issue and recovering your valuable data. Remember to prioritize data backups and preventive measures to minimize the risk of future data loss. The key is to stay informed, act decisively, and seek professional help when necessary. [See also: Best Practices for Data Backup] [See also: Understanding Hard Drive Failure Symptoms]

