Electric Guitar String Replacement: A Comprehensive Guide
The electric guitar. An instrument synonymous with rebellion, artistry, and the sheer joy of making noise. But even the most seasoned guitarists understand that the magic fades when your strings go flat. That twang becomes a thud, and the vibrant notes you once coaxed out of your instrument sound dull and lifeless. This is where the crucial skill of electric guitar string replacement comes into play.
This comprehensive guide will walk you through every step of the electric guitar string replacement process, from choosing the right strings to the final tuning. Whether you’re a complete beginner or a gigging musician, this guide is designed to equip you with the knowledge and confidence to keep your electric guitar sounding its best. We’ll cover everything from the basics of understanding string gauges to troubleshooting common problems.
Why Replace Your Electric Guitar Strings?
The reasons for replacing your electric guitar strings are numerous and compelling. Strings, unlike many other components of your instrument, are consumables. They wear down over time, losing their elasticity and ability to vibrate properly. Here are some key indicators that it’s time for a change:
- Loss of Tone: This is often the most noticeable sign. Old strings sound dull, lifeless, and lack the bright, resonant quality of new strings.
- Difficulty Tuning: Strings that won’t stay in tune are a major headache. Worn strings struggle to hold their pitch, making it difficult to play in tune.
- Corrosion: Sweat, oils from your fingers, and exposure to the environment can cause strings to corrode, leading to a rough feel and premature string breakage.
- String Breakage: This is a clear sign that your strings have reached the end of their lifespan.
- Playing Frequency: The more you play, the faster your strings will wear out. If you play frequently, you’ll need to replace your strings more often.
Neglecting electric guitar string replacement can not only affect your sound, but it can also impact your playing experience, making it less enjoyable and potentially hindering your progress.
Choosing the Right Strings for Your Electric Guitar
The world of electric guitar strings is vast and varied. Choosing the right set can seem daunting at first, but understanding a few key factors will make the process much easier. Your choice will significantly affect your guitar’s sound, feel, and playability.
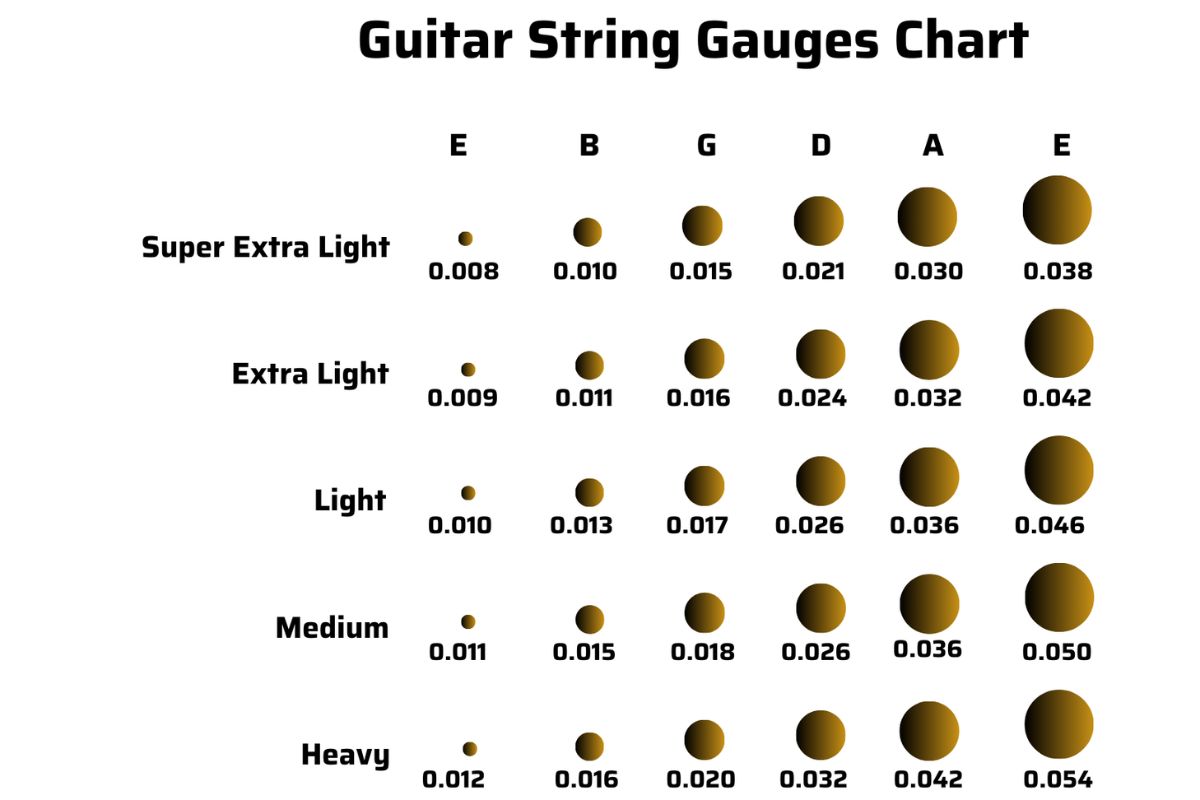
String Gauge
String gauge refers to the thickness of the strings. This is often the most important factor in determining the feel and sound of your guitar. Gauges are typically expressed in thousandths of an inch (e.g., .009, .010, .046). Common gauges include:
- Extra Light (.008-.038): These are the thinnest strings and are easy on the fingers, making them ideal for beginners or players who prefer a lighter touch. They produce a brighter tone but can be prone to buzzing if your action is too low.
- Light (.009-.042): This is a very popular gauge, offering a good balance between playability and tone. They are versatile and suitable for a wide range of playing styles.
- Regular/Medium (.010-.046): These strings offer a fuller, more powerful tone with increased sustain. They require more finger strength and are often preferred by experienced players.
- Heavy (.011-.052 and above): These strings are the thickest and offer the most powerful tone and sustain. They require significant finger strength and are often used for specific tunings or genres like metal.
Experiment with different gauges to find what feels and sounds best for you. Consider your playing style, the tuning you use, and the type of music you play when making your selection. The right gauge is a matter of personal preference, so don’t be afraid to try different options. Remember that changing string gauge may require adjustments to your guitar’s setup, such as the truss rod and action.
String Material
The material of your electric guitar strings also affects their tone and feel. Common materials include:
- Nickel-plated Steel: A very popular choice, nickel-plated steel strings offer a balanced tone with good sustain and a comfortable feel. They are versatile and suitable for a wide range of musical styles.
- Pure Nickel: These strings have a warmer, vintage tone that’s favored by some players. They are often considered to have a smoother feel than nickel-plated steel.
- Stainless Steel: Stainless steel strings are known for their bright tone, long life, and resistance to corrosion. They can be a good choice for players who sweat a lot or live in humid environments.
- Coated Strings: Coated strings have a polymer coating that protects them from corrosion and extends their lifespan. They often have a smoother feel and can reduce finger squeak. However, some players find that the coating can slightly alter the tone.
Again, experimentation is key. Try different materials to find the sound that suits your style.
Winding
The winding of the strings, particularly the wound strings (usually the E, A, D, and sometimes G strings), also influences the sound and feel. There are two main types:
- Roundwound: This is the most common type of winding, where the outer winding wire is round. Roundwound strings offer a bright tone and good grip but can be slightly rough on the frets.
- Flatwound: Flatwound strings have a flat outer winding, resulting in a smoother feel and a warmer, more mellow tone. They are often used in jazz and are easier on the frets.
Tools You’ll Need for Electric Guitar String Replacement
Before you begin the electric guitar string replacement process, gather the necessary tools and materials. Having everything ready will make the job much smoother.
- New Set of Strings: Choose the gauge, material, and type of winding that best suits your needs.
- String Winder: This is a small, inexpensive tool that significantly speeds up the string changing process.
- Wire Cutters or String Cutters: These are essential for cutting the excess string length after installation.
- Tuner: A tuner (electronic or clip-on) is crucial for accurately tuning your guitar.
- Cloth or Cleaning Supplies: Use a soft cloth to clean your fretboard and body.
- Optional: A capo can be helpful if you want to change the strings on your guitar with the capo on.
Step-by-Step Guide to Electric Guitar String Replacement
Now, let’s dive into the step-by-step process of electric guitar string replacement. Follow these instructions carefully to ensure a successful string change.
Step One: Remove the Old Strings
- Loosen the Strings: Use your tuning pegs to loosen each string until it’s slack.
- Cut the Strings: Use your wire cutters to snip the strings near the bridge. This will make it easier to remove them. Be careful not to scratch your guitar’s finish.
- Remove the Strings: Carefully remove the old strings from the bridge and tuning pegs.
- Clean the Fretboard: Use a soft cloth to clean the fretboard and body of your guitar. This will remove any dirt, grime, or sweat buildup.
Step Two: Install the New Strings
- Insert the Ball End: Insert the ball end of the first string (usually the low E string) into the appropriate hole in the bridge. Ensure the ball end is securely seated.
- Thread Through the Tuning Peg: Thread the string through the corresponding tuning peg on the headstock.
- Bend the String: Bend the string at a 90-degree angle just past the hole in the tuning peg to lock it in place.
- Wind the String: Use your string winder to wind the string around the tuning peg, keeping the string taut. Wind the string downwards, ensuring the wraps are neat and organized.
- Repeat for Remaining Strings: Repeat steps 1-4 for the remaining strings, working your way up from the low E string to the high E string.
Step Three: Tune Your Guitar
- Initial Tuning: Use your tuner to tune each string to the correct pitch.
- Stretch the Strings: Gently pull up on each string to stretch it. This will help the strings settle and stay in tune.
- Fine-Tune: Retune your guitar, as the strings will likely have gone out of tune after stretching.
- Repeat: Repeat the stretching and tuning process until your guitar stays in tune.
Step Four: Trim the Excess String
Once your guitar is tuned, use your wire cutters to trim the excess string length near the tuning pegs. Leave about half an inch of string extending past the peg to prevent unraveling.
Troubleshooting Common Problems During Electric Guitar String Replacement
Even with careful planning, you may encounter some issues during the electric guitar string replacement process. Here are some common problems and how to solve them:
- Strings Breaking: If a string breaks during installation, it may be due to a sharp edge on the bridge or tuning peg. Carefully inspect these areas and smooth out any rough spots with a file or sandpaper. Also, make sure the string is installed correctly.
- Strings Going Out of Tune Quickly: This is usually due to the strings not being properly stretched. Repeat the stretching and tuning process until your guitar stays in tune. It can also be caused by the strings not being wound correctly on the tuning pegs.
- Buzzing Strings: If you experience buzzing after changing strings, it may be due to the action (the height of the strings above the frets) being too low. You may need to adjust the action or have a professional set up your guitar. It could also be a result of the string not being seated correctly in the bridge or nut.
- Difficulty Tuning: If you’re having trouble tuning your guitar, make sure you’re using a tuner and that the strings are properly wound around the tuning pegs. Check that the strings are not binding in the nut slots.
Maintaining Your Electric Guitar Strings and Extending Their Life
Proper maintenance can significantly extend the life of your electric guitar strings and improve their performance. Here are some tips:
- Wipe Down Your Strings After Playing: Use a soft cloth to wipe down your strings after each playing session. This will remove sweat, oils, and dirt that can cause corrosion.
- Wash Your Hands Before Playing: Clean hands will help prevent oils and dirt from transferring to your strings.
- Store Your Guitar Properly: Store your guitar in a case or gig bag when not in use to protect it from the elements.
- Consider String Coatings: Coated strings can resist corrosion and extend string life.
- Regularly Clean and Condition Your Fretboard: Use a fretboard cleaner and conditioner to remove dirt and maintain the wood.
By following these tips, you can keep your strings sounding their best for longer, saving you money and ensuring you enjoy your playing experience.
Conclusion
Electric guitar string replacement is a fundamental skill for any guitarist. By understanding the process, choosing the right strings, and following these steps, you can keep your instrument sounding great and your playing experience enjoyable. Remember to experiment with different string gauges and materials to find what suits your playing style. Regular string changes are an essential part of guitar maintenance. With the right knowledge and a little practice, you’ll be able to keep your electric guitar sounding its best for years to come. [See also: How to Choose the Right Guitar for Beginners] [See also: Electric Guitar Maintenance: A Complete Guide] [See also: Common Electric Guitar Problems and Solutions]

