
Electric Fan Relay Wiring: Enhancing Your Car’s Performance
The humming of your car’s engine, the rush of air as you accelerate, and the dependable operation of your vehicle are all part of a symphony of mechanical and electrical systems working in concert. One of the unsung heroes of this orchestra is the electric fan, tasked with keeping your engine cool. While seemingly simple, the electric fan’s efficiency significantly impacts your car’s performance and longevity. A crucial component in this system is the electric fan relay. Understanding the nuances of electric fan relay wiring is paramount for any car enthusiast or anyone aiming to optimize their vehicle’s performance. This article delves into the intricacies of electric fan relay wiring, providing a comprehensive guide to enhance your car’s efficiency and prevent overheating.
The Critical Role of the Electric Fan
The internal combustion engine generates a tremendous amount of heat. This heat, if not properly managed, can lead to catastrophic engine damage, including warped cylinder heads, cracked engine blocks, and complete engine failure. The electric fan plays a vital role in dissipating this heat, especially when the vehicle is idling, traveling at low speeds, or operating in hot weather. By drawing air through the radiator, the electric fan cools the engine coolant, thereby maintaining optimal engine temperature.
The electric fan system typically consists of the fan itself, a temperature sensor, a relay, and the wiring that connects these components to the vehicle’s electrical system. The temperature sensor monitors the engine coolant temperature and signals the relay to activate the fan when the temperature exceeds a predetermined threshold. The relay, in turn, acts as a switch, allowing a large current to flow to the electric fan motor. This is where the electric fan relay wiring becomes critical.
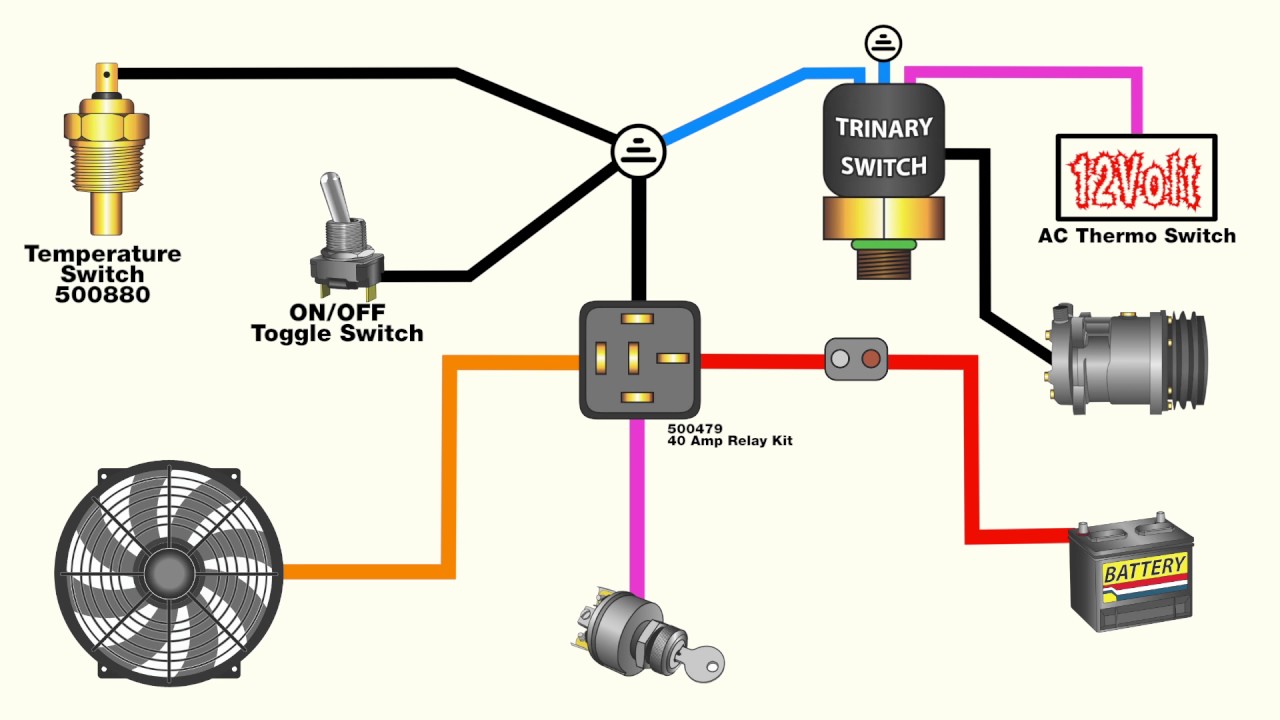
Understanding the Electric Fan Relay
The electric fan relay is an electromechanical switch. It’s a small, relatively inexpensive component, but its function is crucial. It essentially acts as a gatekeeper, controlling the flow of high current to the electric fan motor. Without a relay, the high current required by the fan motor would have to pass through the temperature sensor and other control circuits, potentially damaging them. The relay isolates the control circuit from the high-current circuit, ensuring the safety and longevity of the entire system. The electric fan relay wiring is designed to handle these high currents safely and efficiently.
A typical relay has four or five terminals, each with a specific function:
- Terminal 85: Coil control, typically connected to the positive side of the control circuit (e.g., the temperature sensor).
- Terminal 86: Coil control, typically connected to the negative side of the control circuit (e.g., ground).
- Terminal 30: Power input, connected to a fused power source (usually the battery).
- Terminal 87: Power output, connected to the electric fan motor.
- Terminal 87a (optional): Normally closed contact, used in some applications for alternative fan speeds.
The relay operates based on the principle of electromagnetism. When a current flows through the coil (terminals 85 and 86), it creates a magnetic field that pulls a switch closed, connecting terminals 30 and 87, thereby powering the electric fan.
Decoding the Electric Fan Relay Wiring Diagram
Electric fan relay wiring diagrams can seem intimidating at first glance, but understanding them is key to properly installing and troubleshooting your electric fan system. These diagrams use standardized symbols to represent the various components and their connections. Here’s a breakdown of what to look for:
- Power Source: This is usually represented by a battery symbol and indicates where the power for the fan comes from. The diagram will show the fuse that protects the circuit.
- Relay: The relay is typically depicted as a rectangular box with numbered terminals. The diagram will show which terminals are connected to which components.
- Temperature Sensor: This is often represented by a thermistor symbol. The diagram will show where the sensor is located in the cooling system and how it connects to the relay.
- Electric Fan Motor: The fan motor is usually represented by a circle with a fan blade symbol inside. The diagram will show how the motor is connected to the relay and the ground.
- Wiring: Wires are represented by solid lines. Different colors are often used to indicate different circuits (e.g., power, ground, control).
When studying an electric fan relay wiring diagram, pay close attention to the wire gauge (thickness). The wires must be adequately sized to handle the current drawn by the electric fan motor. Undersized wires can overheat and melt, leading to a system failure or even a fire hazard. Always consult a wiring diagram specific to your vehicle model or the fan kit you are installing.
Step-by-Step Guide to Electric Fan Relay Wiring
While specific wiring configurations may vary depending on the vehicle and the electric fan kit, the general principles remain the same. Here’s a step-by-step guide to help you with the process:
- Gather Your Materials: You’ll need the electric fan, the relay, a fuse holder and fuse (appropriate amperage for the fan motor), wiring (various gauges), connectors (spade terminals, crimp connectors, etc.), wire strippers, crimping tool, and a wiring diagram specific to your vehicle or fan kit.
- Locate the Power Source: Identify a suitable power source for the electric fan. This should be a fused connection to the battery or a power distribution block that can handle the current draw of the fan.
- Connect the Power to the Relay (Terminal 30): Run a wire from the fused power source to terminal 30 on the relay.
- Connect the Fan Motor to the Relay (Terminal 87): Run a wire from terminal 87 on the relay to the positive terminal of the electric fan motor.
- Ground the Fan Motor: Connect the negative terminal of the electric fan motor to a good ground point on the vehicle’s chassis.
- Connect the Temperature Sensor to the Relay (Terminal 85/86): Connect the control side of the relay. Typically, one wire from the temperature sensor goes to terminal 85, and the other wire goes to ground (terminal 86) or to a switched power source, depending on the relay type and the desired operation.
- Verify the Connections and Test: Double-check all connections to ensure they are secure and properly crimped. Turn on the ignition and allow the engine to warm up. The electric fan should activate when the engine coolant reaches the predetermined temperature.
- Secure the Wiring: Use cable ties or wire loom to secure the wiring and protect it from damage.
If you are not comfortable working with electrical systems, it is always best to consult a qualified mechanic. Incorrect electric fan relay wiring can lead to serious damage to your vehicle.
Common Issues and Troubleshooting
Even with proper installation, problems can arise. Here are some common issues and troubleshooting tips:
- Fan Not Turning On:
- Check the Fuse: The first step is always to check the fuse. Replace it if it’s blown.
- Test the Relay: Use a multimeter to test the relay. Apply power to the coil terminals (85 and 86) and check for continuity between the power output terminals (30 and 87).
- Check the Temperature Sensor: Ensure the temperature sensor is functioning correctly. You can test it with a multimeter or by temporarily bypassing it.
- Inspect the Wiring: Look for loose connections, broken wires, or corrosion.
- Fan Running Continuously:
- Check the Temperature Sensor: The sensor might be faulty and sending a constant signal to the relay.
- Check the Relay: The relay might be stuck closed. Replace it.
- Wiring Issues: A short circuit in the control circuit could be causing the relay to activate continuously.
- Fan Running Slowly:
- Check the Voltage: Ensure the fan motor is receiving the correct voltage. A low voltage can cause slow operation.
- Wiring Issues: Corrosion or poor connections can cause voltage drops, leading to slow fan speed.
Troubleshooting electric fan relay wiring often involves a process of elimination. By systematically checking each component and connection, you can usually identify and resolve the issue. Remember to disconnect the battery before working on any electrical components.
Benefits of Proper Electric Fan Relay Wiring
Correctly implemented electric fan relay wiring offers several key advantages:
- Improved Engine Cooling: A properly functioning electric fan ensures optimal engine temperature regulation, preventing overheating and potential engine damage.
- Enhanced Engine Performance: By maintaining the correct operating temperature, the engine can perform at its peak efficiency.
- Increased Fuel Efficiency: A well-regulated engine temperature can contribute to improved fuel economy.
- Extended Engine Life: Preventing overheating helps extend the life of engine components.
- Reduced Noise: Modern electric fan systems are often quieter than mechanical fans.
Advanced Considerations for Electric Fan Relay Wiring
Beyond basic wiring, there are advanced techniques and considerations for optimizing your electric fan system:
- Variable Speed Controllers: Some systems utilize variable speed controllers to modulate fan speed based on engine temperature. This offers greater control over cooling and can improve efficiency.
- Multiple Fans: High-performance vehicles often use multiple electric fans to provide increased cooling capacity.
- PWM (Pulse Width Modulation) Control: PWM control allows for precise and efficient control of fan speed, reducing power consumption.
- Relay Protection: Consider using a diode across the relay coil to protect the control circuit from voltage spikes generated when the relay is de-energized.
Conclusion: Mastering Electric Fan Relay Wiring
Understanding and implementing proper electric fan relay wiring is a crucial aspect of vehicle maintenance and performance optimization. From the basic principles of relay operation to troubleshooting common issues, this guide has provided a comprehensive overview of the subject. By following the steps outlined and paying attention to detail, you can ensure your electric fan system operates efficiently, keeping your engine cool and your vehicle performing at its best. Remember to always prioritize safety and consult a professional if you are unsure about any aspect of the wiring process. Proper electric fan relay wiring is an investment in your vehicle’s longevity and performance.
[See also: Radiator Flush: A Comprehensive Guide to Engine Cooling System Maintenance]
[See also: Diagnosing and Repairing Overheating Engines]
[See also: Upgrade Your Cooling System: Choosing the Right Electric Fan for Your Car]

