Easy Disc Brake Emergency Brake Adjustment Guide: Your Safety Starts Here
The integrity of your vehicle’s braking system is paramount for your safety and the safety of others on the road. Among the critical components of this system are disc brakes and the often-overlooked emergency brake (also known as the parking brake). While disc brakes handle the majority of your stopping power, the emergency brake provides a vital backup and is essential for securing your vehicle when parked. This easy disc brake emergency brake adjustment guide will walk you through the process of understanding and maintaining this crucial safety feature.
The emergency brake, often a cable-actuated system, works independently of your primary hydraulic brakes. It’s designed to hold your car stationary, even on inclines, and can also serve as a secondary braking system in the event of primary brake failure. Ensuring your emergency brake is properly adjusted is not just a matter of convenience; it’s a matter of safety. This easy disc brake emergency brake adjustment guide aims to demystify the process, empowering you to maintain this critical system.
Understanding the Emergency Brake System
Before diving into adjustments, it’s important to understand how the emergency brake system works. In most vehicles with disc brakes, the emergency brake operates by either:
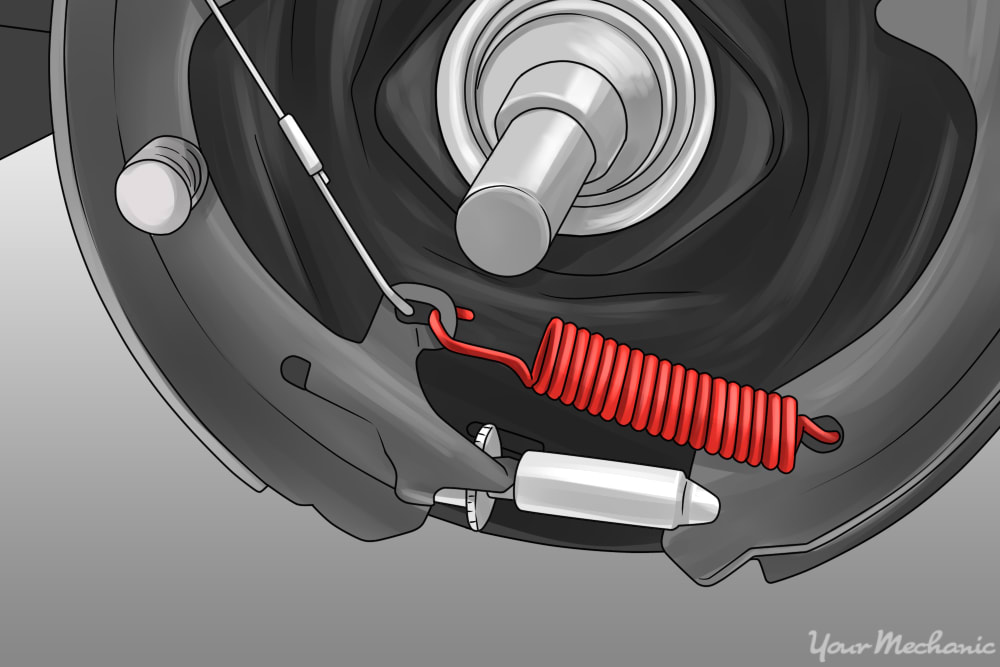
- Mechanical Cables: These cables connect the brake lever or pedal to the rear brake calipers. When engaged, the cables pull a lever on the caliper, applying pressure to the brake pads.
- Integrated Caliper Systems: Some calipers have an integrated mechanism for the emergency brake. This typically involves a screw or piston that is mechanically driven to apply the brake pads.
Regardless of the design, the core principle remains the same: a mechanical linkage applies pressure to the brake pads, clamping them against the rotor and preventing wheel rotation. A poorly adjusted emergency brake can lead to several issues, including reduced braking effectiveness, difficulty engaging the brake, and premature wear of brake components. This easy disc brake emergency brake adjustment guide will help you avoid these pitfalls.
Tools and Materials You’ll Need
Gathering the right tools and materials before you start is crucial for a smooth and successful adjustment. Here’s a list of what you’ll likely need:
- Wheel chocks: To secure the vehicle.
- Jack and jack stands: To safely lift and support the vehicle.
- Wrench or socket set: For adjusting the cable or mechanism. The specific size will vary depending on your vehicle.
- Gloves: To keep your hands clean.
- Owner’s manual: To locate the adjustment points and specifications for your vehicle.
- Penetrating oil (optional): If cables are rusty.
- Brake cleaner (optional): For cleaning the brake components.
Having these items readily available will streamline the adjustment process. Consult your vehicle’s owner’s manual for specific tool recommendations, as requirements may vary. With this easy disc brake emergency brake adjustment guide, you’ll be well-prepared.
Step-by-Step Adjustment Guide
The adjustment procedure will vary depending on your vehicle’s make and model, and the type of emergency brake system it uses. Always consult your owner’s manual for specific instructions. However, the following steps provide a general overview of the process. This easy disc brake emergency brake adjustment guide provides a simplified approach.
Preparation
- Park on a level surface: Engage the parking brake and turn off the engine.
- Chock the front wheels: This will prevent the vehicle from rolling.
- Loosen lug nuts: Slightly loosen the lug nuts on the rear wheels before lifting the vehicle.
- Raise and support the vehicle: Use a jack to lift the rear of the vehicle and securely place jack stands under the frame.
- Remove the rear wheels: Once the vehicle is securely supported, remove the rear wheels.
Locating the Adjustment Point
The adjustment point can be found in one of several locations:
- Under the center console: Many vehicles have an adjustment nut or cable adjuster located under the center console, accessible from inside the car.
- Near the rear brake calipers: Some vehicles have an adjustment mechanism directly on the caliper.
- Along the brake cables: You might find an adjustment point somewhere along the cable run, often near the rear axle.
Consult your owner’s manual to identify the exact location for your vehicle. This easy disc brake emergency brake adjustment guide stresses the importance of this step.
Adjusting the Emergency Brake
- Loosen the cable: If you’re adjusting the cable, loosen the adjustment nut or mechanism. This prevents overtightening.
- Engage the emergency brake lever/pedal: Apply the emergency brake lever or pedal a few clicks/inches.
- Tighten the adjustment: Gradually tighten the adjustment nut or mechanism until you feel a slight resistance. The goal is to have the brake pads just begin to contact the rotor.
- Check the wheel rotation: Try to rotate the rear wheels by hand. They should rotate with minimal drag. If the wheels are dragging significantly, the adjustment is too tight; loosen the adjustment slightly. If the wheels spin freely, the adjustment may need to be tightened.
- Release and re-engage: Release the emergency brake completely and then re-engage it. Repeat the wheel rotation test. The wheels should now have more resistance when the emergency brake is engaged.
- Final adjustment: Make any further minor adjustments to achieve the desired balance between holding power and wheel rotation.
This easy disc brake emergency brake adjustment guide emphasizes precision. The goal is to have the emergency brake engage firmly without causing excessive drag.
Reassembly and Testing
- Reinstall the wheels: Put the wheels back on and tighten the lug nuts to the manufacturer’s specifications.
- Lower the vehicle: Use the jack to lower the vehicle to the ground.
- Test the emergency brake: Park on a slight incline and test the emergency brake to ensure it holds the vehicle securely.
- Road test (optional): If you feel comfortable, take the vehicle for a short road test to confirm the emergency brake functions correctly.
This easy disc brake emergency brake adjustment guide covers all the necessary steps.
Common Problems and Troubleshooting
Even with the best intentions, you might encounter some problems during the adjustment process. Here are some common issues and their potential solutions:
- Emergency brake doesn’t hold: The cable might be stretched, or the brake pads may be worn. You might need to replace the cable or brake pads.
- Emergency brake drags: The adjustment is too tight, or the caliper might be seized. Loosen the adjustment or inspect the caliper.
- Difficulty finding the adjustment point: Consult your owner’s manual or perform an online search for your vehicle’s specific adjustment location.
- Cables are frozen: Cables can freeze in cold weather. Apply penetrating oil and allow it to soak for some time.
If you are unsure about any of these steps, or if you encounter a problem you cannot resolve, it’s best to consult a qualified mechanic. This easy disc brake emergency brake adjustment guide advises seeking professional help when needed.
Important Safety Considerations
Working on your vehicle’s brakes can be dangerous if not done correctly. Always prioritize safety:
- Wear safety glasses: Protect your eyes from debris.
- Use wheel chocks and jack stands: Never work under a vehicle supported only by a jack.
- Work in a well-ventilated area: Some brake cleaners and penetrating oils can release harmful fumes.
- Consult a professional if needed: If you’re not comfortable with the process, seek professional assistance.
This easy disc brake emergency brake adjustment guide emphasizes the importance of safety at every stage.
When to Seek Professional Help
While this easy disc brake emergency brake adjustment guide aims to provide a comprehensive overview, there are times when seeking professional help is the best course of action. Consider consulting a mechanic if:
- You are not comfortable working on your brakes.
- You are unsure about any of the steps.
- The emergency brake is still not functioning correctly after adjustment.
- You suspect any other brake-related problems.
A qualified mechanic has the expertise and equipment to diagnose and repair any brake issues safely and effectively. Your safety is paramount. [See also: Brake Repair Costs: What to Expect].
Conclusion: Maintaining Your Emergency Brake for Road Safety
Maintaining your emergency brake is a critical aspect of vehicle safety. This easy disc brake emergency brake adjustment guide has provided you with the knowledge and steps necessary to adjust your emergency brake properly. By following the guidelines in this guide, you can help ensure your vehicle’s emergency brake functions effectively, providing an essential layer of safety on the road. Regular inspection and maintenance of your braking system, including the emergency brake, are essential for safe driving. Remember to always prioritize safety and seek professional help if you are unsure about any aspect of the process. [See also: How Often Should You Replace Brake Pads?].
By understanding the system, gathering the right tools, and following the step-by-step instructions, you can confidently adjust your emergency brake and contribute to your own safety and the safety of others. This easy disc brake emergency brake adjustment guide empowers you to take control of an important aspect of your vehicle’s maintenance. Regularly checking and adjusting your emergency brake is a proactive step toward ensuring your vehicle’s overall safety and functionality. This final reiteration of the easy disc brake emergency brake adjustment guide highlights the importance of regular maintenance.

