
3.2L VR6: A Deep Dive into Rod Bearing Replacement
The 3.2L VR6 engine, a jewel of German engineering, is known for its unique sound and robust performance. However, like all mechanical marvels, it requires diligent maintenance to ensure longevity. One critical aspect of this maintenance is the timely replacement of rod bearings. This comprehensive guide will walk you through the 3.2L VR6 rod bearing replacement process, providing detailed instructions, essential insights, and crucial considerations to help you keep your engine running smoothly.
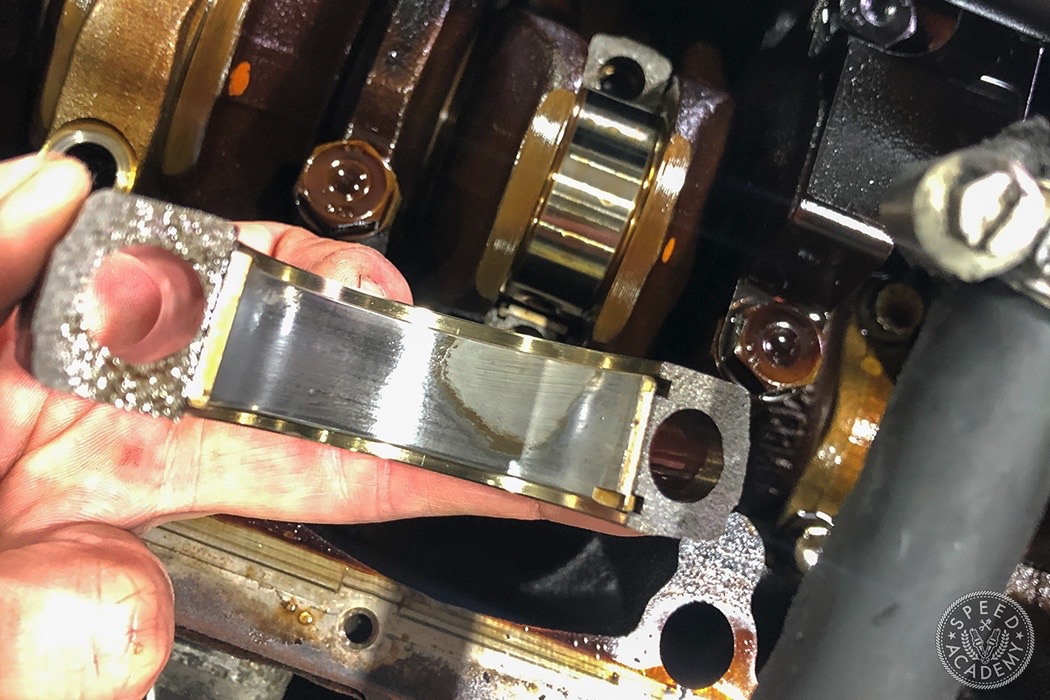
The 3.2L VR6, a staple in various Volkswagen and Audi models, is celebrated for its compact design and distinctive exhaust note. The rod bearings, also known as connecting rod bearings, are vital components that sit between the connecting rods and the crankshaft journals. Their primary function is to reduce friction and allow the connecting rods to rotate smoothly as the crankshaft spins. Over time, these bearings wear down due to the constant friction and pressure, leading to potential engine damage if not addressed promptly. This guide focuses specifically on the 3.2L VR6, offering specific instructions to ensure a successful rod bearing replacement.
Understanding the Importance of Rod Bearings
Rod bearings are subjected to extreme stress within the 3.2L VR6 engine. They endure immense loads and temperatures, making them prone to wear and tear. As the bearings deteriorate, they can cause several issues, including:
- Increased engine noise, often a knocking or tapping sound.
- Reduced oil pressure, as the worn bearings allow oil to escape.
- Increased metal particles in the oil, leading to accelerated wear on other engine components.
- Ultimately, catastrophic engine failure if left unaddressed.
The 3.2L VR6 engine’s design, with its relatively high specific output, puts additional strain on these components. Regular inspection and, when necessary, replacement of rod bearings are crucial for preventing costly repairs and extending the life of your engine. This guide will help you recognize the signs of failing rod bearings and guide you through the replacement process.
Identifying the Need for Rod Bearing Replacement in Your 3.2L VR6
Recognizing the symptoms of worn rod bearings is the first step in protecting your 3.2L VR6 engine. Several telltale signs indicate that a rod bearing replacement is necessary. Here are some indicators to watch out for:
- Knocking Noise: A distinct knocking or tapping sound, especially noticeable at idle or under acceleration, is a primary indicator. The sound often changes with engine speed. This is one of the most common symptoms associated with failing 3.2L VR6 rod bearings.
- Reduced Oil Pressure: Worn bearings can lead to a drop in oil pressure. Monitor your oil pressure gauge regularly. Low readings, particularly at idle, can suggest bearing wear.
- Metal in the Oil: When changing your oil, inspect the oil for metal particles. This can be a sign of significant bearing wear. A magnetic drain plug can help catch these particles.
- Engine Vibration: Increased vibration, particularly at certain engine speeds, can also point to bearing issues.
- Check Engine Light: While not always directly related, other engine problems stemming from the bearing failure may trigger the check engine light.
If you observe any of these symptoms in your 3.2L VR6, it’s crucial to have the engine inspected by a qualified mechanic. Ignoring these signs can lead to severe engine damage, potentially requiring a complete engine rebuild or replacement. This guide will provide detailed instructions, but always prioritize professional assessment if you’re unsure.
Tools and Materials Required for 3.2L VR6 Rod Bearing Replacement
Before embarking on the 3.2L VR6 rod bearing replacement, gather the necessary tools and materials. Having everything ready will streamline the process and prevent delays. Here’s a comprehensive list:
- New Rod Bearings: Ensure you purchase the correct size and type of rod bearings for your 3.2L VR6. Consider upgrading to performance bearings for added durability.
- Oil and Filter: Fresh engine oil and a new oil filter are essential after the replacement.
- Torque Wrench: A torque wrench is crucial for accurately tightening bolts to the manufacturer’s specifications.
- Jack and Jack Stands: For safely lifting and supporting the vehicle.
- Sockets and Wrenches: A comprehensive set of sockets and wrenches, including metric sizes.
- Feeler Gauges: To check the bearing clearances.
- Assembly Lube: To lubricate the new bearings during installation.
- Cleaning Supplies: Brake cleaner or similar solvent for cleaning engine components.
- New Connecting Rod Bolts: It’s highly recommended to replace the connecting rod bolts.
- Other Supplies: Gloves, shop towels, and a drain pan.
Having the right tools and materials is critical for a successful 3.2L VR6 rod bearing replacement. Prioritize quality tools to ensure the job is done correctly and safely.
Step-by-Step Instructions for 3.2L VR6 Rod Bearing Replacement
This section provides a detailed, step-by-step guide for replacing the rod bearings in your 3.2L VR6 engine. Always consult your vehicle’s service manual for specific torque specifications and procedures. This is a general guide, and variations may exist.
- Preparation:
- Safely lift and secure the vehicle using a jack and jack stands.
- Disconnect the negative battery terminal.
- Drain the engine oil.
- Accessing the Bearings:
- Remove any components obstructing access to the oil pan, such as the exhaust system.
- Remove the oil pan. This may require removing other components for clearance.
- Removing the Connecting Rods:
- Remove the connecting rod bolts. These are often stretch bolts and should be replaced.
- Carefully remove the connecting rod caps.
- Gently push the connecting rod and piston assembly up and out of the engine, being careful not to damage the crankshaft.
- Inspecting the Crankshaft:
- Inspect the crankshaft journals for any signs of damage, such as scoring or wear. If damage is present, the crankshaft may need to be machined or replaced.
- Installing the New Bearings:
- Clean the connecting rods and caps thoroughly.
- Install the new rod bearings in the connecting rods and caps. Ensure they are seated correctly.
- Apply assembly lube to the new bearings.
- Carefully position the connecting rod and piston assembly back into the engine.
- Install the connecting rod cap and new bolts.
- Torque the connecting rod bolts to the manufacturer’s specifications using a torque wrench.
- Reassembly:
- Reinstall the oil pan, ensuring a proper seal.
- Reinstall any components that were removed for access.
- Fill the engine with fresh oil and install a new oil filter.
- Reconnect the negative battery terminal.
- Final Steps:
- Start the engine and check for any leaks or unusual noises.
- Monitor the oil pressure gauge.
- Allow the engine to run for a short period and then re-torque the connecting rod bolts if specified by the manufacturer.
This step-by-step guide provides a detailed overview. Always consult your specific vehicle’s service manual for exact specifications and procedures. The 3.2L VR6 requires precision, so take your time and work carefully.
Post-Replacement Considerations for Your 3.2L VR6
After successfully replacing the rod bearings in your 3.2L VR6, several post-replacement considerations are crucial for optimal engine performance and longevity. These steps will help ensure the engine runs smoothly and prevent future issues.
- Break-in Period: Avoid high engine speeds and heavy loads for the first few hundred miles. This allows the new bearings to properly seat and the engine to break in.
- Regular Oil Changes: Change the oil and filter after the first 500 miles to remove any potential debris from the break-in process. Continue to adhere to the manufacturer’s recommended oil change intervals.
- Oil Type: Use the correct type of oil specified for your 3.2L VR6. Refer to your vehicle’s owner’s manual.
- Monitor Performance: Pay close attention to any unusual noises or performance issues. Regularly check the oil pressure and monitor for any signs of leaks.
- Professional Inspection: Consider having a professional mechanic inspect the engine after a few hundred miles to ensure everything is operating correctly.
Following these post-replacement considerations will help you maximize the life and performance of your 3.2L VR6 engine. Proper care and maintenance are key to enjoying the unique driving experience this engine provides.
Common Mistakes to Avoid During 3.2L VR6 Rod Bearing Replacement
While the 3.2L VR6 rod bearing replacement is manageable for experienced DIYers, several common mistakes can lead to problems. Avoiding these errors will increase your chances of a successful repair.
- Improper Torque: Failing to torque the connecting rod bolts to the correct specifications can lead to bearing failure. Always use a torque wrench and follow the manufacturer’s recommendations.
- Incorrect Bearing Installation: Installing the bearings incorrectly or using the wrong size can cause immediate engine damage. Double-check that the bearings are seated properly.
- Failure to Clean Components: Leaving debris or contaminants in the engine can lead to accelerated wear on the new bearings. Clean all components thoroughly before reassembly.
- Ignoring the Crankshaft: Failing to inspect the crankshaft journals for damage can result in the new bearings failing prematurely. Address any crankshaft issues before installing new bearings.
- Using Old Bolts: Never reuse connecting rod bolts. Always replace them with new ones.
Being aware of these common mistakes and taking the necessary precautions will help you avoid costly errors and ensure a successful 3.2L VR6 rod bearing replacement. The 3.2L VR6 engine deserves meticulous care.
When to Seek Professional Help
While this guide provides detailed instructions, it’s essential to recognize when to seek professional assistance. Not every 3.2L VR6 owner is equipped to perform a rod bearing replacement. Here are some situations where consulting a qualified mechanic is advisable:
- Lack of Experience: If you’re unfamiliar with engine repair or lack the necessary tools and skills, it’s best to seek professional help.
- Crankshaft Damage: If the crankshaft journals show signs of damage, such as scoring or wear, it may require machining or replacement. This is a job best left to experienced mechanics.
- Uncertainty: If you’re unsure about any part of the process, it’s always better to err on the side of caution and consult a professional.
- Limited Workspace: If you don’t have access to a well-equipped workspace, such as a garage with a lift, it may be difficult to perform the repair safely and effectively.
Your 3.2L VR6 engine is a valuable asset. Prioritizing professional help when needed will prevent potential damage and ensure the longevity of your engine. The 3.2L VR6 engine is worth the investment in professional expertise.
Conclusion: Ensuring the Longevity of Your 3.2L VR6
Replacing the rod bearings in your 3.2L VR6 is a significant maintenance task that can extend the life and performance of your engine. By understanding the symptoms, gathering the necessary tools, following the detailed instructions, and avoiding common mistakes, you can successfully complete this repair. Remember, proper maintenance, including timely rod bearing replacement, is essential for keeping your 3.2L VR6 running smoothly for years to come. Always prioritize safety and consult a professional mechanic if you are unsure about any aspect of the process.
The 3.2L VR6 is a unique and enjoyable engine. Taking care of its components, including the rod bearings, will allow you to continue enjoying the distinctive sound and performance that it provides. This guide empowers you to tackle this crucial maintenance task with confidence. The 3.2L VR6 rod bearing replacement is a key step in keeping your engine healthy.
[See also: Related Article Titles]

